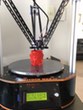
1st day, Thermaltake Toughpower 750w modular power supply wired and fitted into base.
shapeshifters max v2 build
-
shapeshifter
- Prints-a-lot
- Posts: 27
- Joined: Tue Oct 14, 2014 11:08 pm
- Location: Somewhere out there.
shapeshifters max v2 build
Hi Everyone at SeeMeCNC, looks like this is the place to be for all things delta! It has been great looking through the threads and finding so many awesome builds and people helping each other get the best from their machines. I am a recent delta convert thanks to our local Australian supplier DooDadDoes who have been a font of knowledge and most genuine helpful and all around nice people to deal with. I had never even considered getting rid of my hugely expensive name brand printer until I started talking to Isaac, who, somehow inspired me to make the jump over to delta heaven. He has helped me throughout the entire build and even printed me an E3D mount and had it shipped to me so quick it wasn't funny, all so I could get up and running quickly and painlessly. If you have''t already guessed I'm a pretty big fan of old fashioned genuine customer service and product knowledge of which Isaac and DooDadDoes have by the bucket load. So, thanks Isaac and hi to everyone!! Here are a few photos from the build I started about a week ago, great kit, great manual and overall positive experience, hopefully you enjoy the pictures, ill let them speak for themselves. 

1st day, Thermaltake Toughpower 750w modular power supply wired and fitted into base. 2nd day, wires run to top of machine and wired, also fitted tie down point from offcuts to relieve strain on the cables. 3rd day, 2 pin header soldered onto rambo, also soldered up heated bed etc Switching it on for the first time. Hotend (E3D) mount printed for me by DooDadDoes, thanks Isaac! Firmware uploaded, nearly time for calibration. The first plastic to pass through the nozzle.
The first print!! Yes that lowpoly pokemon is actually very small, so far really happy with the print quality and I havent even done any fine tuning yet. Loving this machine.
1st day, Thermaltake Toughpower 750w modular power supply wired and fitted into base. 2nd day, wires run to top of machine and wired, also fitted tie down point from offcuts to relieve strain on the cables. 3rd day, 2 pin header soldered onto rambo, also soldered up heated bed etc Switching it on for the first time. Hotend (E3D) mount printed for me by DooDadDoes, thanks Isaac! Firmware uploaded, nearly time for calibration. The first plastic to pass through the nozzle.
Re: shapeshifters max v2 build
Hi
Another doodaddoes customer here too.... I came from a DaVinci 3D Printer
Delta is the way...... They rock!
My build log is down a little way. The strain relief looks good, might have to do a mod
Another doodaddoes customer here too.... I came from a DaVinci 3D Printer
Delta is the way...... They rock!
My build log is down a little way. The strain relief looks good, might have to do a mod
Bob
Rostock Max V2, Ball Cup Arms, New Carriages, HE280, Dampers, PSU Breathing, Simplify 3D, GeckoTek3D, Raspberry Pi3. Duet soon... Kossel Mini still under construction.
Delta's are the way!
Rostock Max V2, Ball Cup Arms, New Carriages, HE280, Dampers, PSU Breathing, Simplify 3D, GeckoTek3D, Raspberry Pi3. Duet soon... Kossel Mini still under construction.
Delta's are the way!
-
shapeshifter
- Prints-a-lot
- Posts: 27
- Joined: Tue Oct 14, 2014 11:08 pm
- Location: Somewhere out there.
Re: shapeshifters max v2 build
Hi Crocky
Yes DooDadDoes honestly have the best customer service in the industry I think. My last printer was a Stratasys Prodigy Plus and to be honest after building this machine I am glad I got rid of it. Loving the machine and the whole open source community that surrounds it. I had checked out your thread during the build, nice to meet a fellow Aussie.
Yes DooDadDoes honestly have the best customer service in the industry I think.
-
McSlappy
- Printmaster!
- Posts: 800
- Joined: Wed Dec 11, 2013 9:11 pm
- Location: Queensland, Australia
- Contact:
Re: shapeshifters max v2 build
You guys are making me embarrassed 
I really just want to offer the support that I wish I'd had when working on my first machine (a horrid cartesian. Not saying all cartesians are horrid, but this one was pretty rotten).
The build is looks awesome Shapeshifter! And that tiny bulbasaur is very impressive too!
Well done and good work on a kickass build!
Isaac
I loved my Rostock so much I now sell them in Oz
-
shapeshifter
- Prints-a-lot
- Posts: 27
- Joined: Tue Oct 14, 2014 11:08 pm
- Location: Somewhere out there.
Re: shapeshifters max v2 build
Thanks Isaac, my success is largely due to you so dont be embarrassed just enjoy knowing you have one very happy customer over here.
Thought that seeing as I had already half built the machine by the time I started posting that I would throw up a few pics of the ongoing modifications and minor tweaks I have been making. Absolutely loving having such a flexible and tweak-able platform to work from, after the hours of frustration that my last machine would give me this one is actually fun to play with.
Printed a new mount for the E3D, I was trying for minimalist and function with the hotend mounted underneath the platform so that I can see whats happening and so that I have a small amount more airflow whilst still being able to print ABS, PC and Nylon, without having to add a layer fan. My layer fan is being used as extra cooling for the E3D so it can stay cool when running 300+ potentially printing PC. I also slowed the fans down by setting 240 instead of 255 in the firmware to reduce vibration.
Designed and printed a new spool holder which is about 25mm higher than stock to allow me to use some of the left over stratasys spools (which are taller) I had without having to re-spool everything all over again.
Printed a new cover for the EzyStruder out of PC just to give the PC a go and thought it looked cool so put it on, ill keep the original one as a spare but I dont think this one will need replacing any time soon.
And lastly designed and printed a "filament funnel"? if you can call it that so that I could clean the filament on its way to the extruder and then keep it inside a ptfe tube until it gets to the drive wheel. Printed in Bridge which has turned out to be a great material to work with.
Ill keep updating this thread as I think of more things that I can modify or tweak in some kind of way... Next up is belt tensioners and after that well... who knows.
Thought that seeing as I had already half built the machine by the time I started posting that I would throw up a few pics of the ongoing modifications and minor tweaks I have been making. Absolutely loving having such a flexible and tweak-able platform to work from, after the hours of frustration that my last machine would give me this one is actually fun to play with.
Printed a new mount for the E3D, I was trying for minimalist and function with the hotend mounted underneath the platform so that I can see whats happening and so that I have a small amount more airflow whilst still being able to print ABS, PC and Nylon, without having to add a layer fan. My layer fan is being used as extra cooling for the E3D so it can stay cool when running 300+ potentially printing PC. I also slowed the fans down by setting 240 instead of 255 in the firmware to reduce vibration.
-
Earthbound
- Printmaster!
- Posts: 458
- Joined: Sun Sep 07, 2014 2:39 am
Re: shapeshifters max v2 build
shapeshifter,
Nice build and mods. Would you be willing to share the STL file for your spool holder?
Nice build and mods. Would you be willing to share the STL file for your spool holder?
"Trust no quote from the Internet." - Abraham Lincoln
-
shapeshifter
- Prints-a-lot
- Posts: 27
- Joined: Tue Oct 14, 2014 11:08 pm
- Location: Somewhere out there.
Re: shapeshifters max v2 build
Hi Earthbound,
Thanks and sure no worries...I printed it in three pieces just so I didn't have to do any super long prints till I get it dialed in so its two of the arm pieces and the little nose piece on the end, all printed fine with no support.
Just made a few more changes today so ill upload some more pics and details soon...
-
shapeshifter
- Prints-a-lot
- Posts: 27
- Joined: Tue Oct 14, 2014 11:08 pm
- Location: Somewhere out there.
It's a bird, it's a plane, its 1100 Watts, damn...
Ok well I just made THE BEST mod yet to the rostock today and I'm verry happy with the results so I thought I would share the happiness around. It all started last night when the power just cut out to the machine while I was trying to do a print with a 105C bed and a 255C nozzle temp, I decided then that the machine needs a pressure test so I dont get stuck with it stopping on me mid print or while I'm not watching it. I set a 120 C bed and a 255 nozzle temp and let it get on with the job.... I got it up to temp (well almost) once before it just started cutting out on me time after time... I removed some covers, it still cut out... I removed all the covers and panels, it still cut out... I let it cool, ran it up to temp to get a benchmark and thats where I switched it off and started the dissassembly. 
If you have read the first post you would know I already had a Thermaltake Toughpower 750w CM but Thermal's ran high and tough it certainly wasn't so it had to go. Just for reference here's my warm up times for the Thermaltake, I only started heating the hotend after Heated Bed had hit 110C but it kept switching itself off and subsequently to get to 115C I had to forego Hotend ignition... boo... I will say though that at least the thermaltake shut tself down and didnt try to catch fire on me or something.
This was also wired correctly as in I had 3x 18AWG wires running from each of the 4 12V rails with 2 rail (6x18AWG wires) dedicated to the Heated Bed which apparently should have been 36 Amps total available to the Heated bed circuit.
Thermaltake 750w Test:
Ambient Air Temp 24C
Heated Bed starting temp 24.4C
Time to heat to 100C = 12 minutes.
Time to heat to 110C = 17 minutes.
Time to heat to 115C = 20 minutes. (hotend switched off)
Time to heat to 120C = Failed to reach temp due to psu failure. (Ran out of steam pffft)
So today I spent a large part of the day re-wiring and installing the new power supply, a stunningly beautiful Coolermaster 1100W UCP (Ultimate Circuit Protection) unit that I had lying around. It puts out 1350W peak too by the way so I wasn't going to run out of juice this time...I hoped...
Heres the pics of the change over and re-wire.
6 x 12V Rails at a whopping 22 Amps each.
All the wires I didn't need were swiftly cut off at the knees... a bit hesitantly but swiftly none the less.
My finished wiring.
0.38A OK that should do the trick.
Copper.  Woop there it is...
Yes that's a lot of wires, I used what I had which meant as many 18AWG wires as I could cram in there. Two rails dedicated to the bed (44A), two to the logic and hotend etc (44A), one goes to the motors (22A) and theres one rail (22A) spare for future requirements plus still the 5V and 3.3V available for future use as well.
Neat and tidy.
Boom.
Woop there it is...
Yes that's a lot of wires, I used what I had which meant as many 18AWG wires as I could cram in there. Two rails dedicated to the bed (44A), two to the logic and hotend etc (44A), one goes to the motors (22A) and theres one rail (22A) spare for future requirements plus still the 5V and 3.3V available for future use as well.
Neat and tidy.
Boom.  And finally for anyone who is interested and can be bothered reading all my ramblings...
Coolermaster 1100W UCP Test:
Ambient Air Temp 24C
Heated Bed starting temp 24.0C
Time to heat to 100C = 9.5 minutes. (save 2.5 minutes)
Time to heat to 110C = I bloody missed it coz it went so quick by the time I checked it was nearly at 115C
Time to heat to 115C = 14 minutes. (hotend switched off will test hotend on soon but I doubt it will make a difference)
Time to heat to 120C = 16 minutes. (it wanted to keep going lol, how hot can I take this bed for testing purposes??)
As a note that is the potential Amps available to the Rambo... I still only have the bed wired up to the Rambo with the standard wiring as per the assembly guide so maybe I can do better yet but i've had enough wiring for one day.
I call that a success and time well spent, now to re-calibrate and start printing.
If you have read the first post you would know I already had a Thermaltake Toughpower 750w CM but Thermal's ran high and tough it certainly wasn't so it had to go. Just for reference here's my warm up times for the Thermaltake, I only started heating the hotend after Heated Bed had hit 110C but it kept switching itself off and subsequently to get to 115C I had to forego Hotend ignition... boo... I will say though that at least the thermaltake shut tself down and didnt try to catch fire on me or something.
This was also wired correctly as in I had 3x 18AWG wires running from each of the 4 12V rails with 2 rail (6x18AWG wires) dedicated to the Heated Bed which apparently should have been 36 Amps total available to the Heated bed circuit.
Thermaltake 750w Test:
Ambient Air Temp 24C
Heated Bed starting temp 24.4C
Time to heat to 100C = 12 minutes.
Time to heat to 110C = 17 minutes.
Time to heat to 115C = 20 minutes. (hotend switched off)
Time to heat to 120C = Failed to reach temp due to psu failure. (Ran out of steam pffft)
So today I spent a large part of the day re-wiring and installing the new power supply, a stunningly beautiful Coolermaster 1100W UCP (Ultimate Circuit Protection) unit that I had lying around.
Heres the pics of the change over and re-wire.
6 x 12V Rails at a whopping 22 Amps each.
Coolermaster 1100W UCP Test:
Ambient Air Temp 24C
Heated Bed starting temp 24.0C
Time to heat to 100C = 9.5 minutes. (save 2.5 minutes)
Time to heat to 110C = I bloody missed it coz it went so quick by the time I checked it was nearly at 115C
Time to heat to 115C = 14 minutes. (hotend switched off will test hotend on soon but I doubt it will make a difference
Time to heat to 120C = 16 minutes. (it wanted to keep going lol, how hot can I take this bed for testing purposes??)
As a note that is the potential Amps available to the Rambo... I still only have the bed wired up to the Rambo with the standard wiring as per the assembly guide so maybe I can do better yet but i've had enough wiring for one day.
I call that a success and time well spent, now to re-calibrate and start printing.
-
Eaglezsoar

- ULTIMATE 3D JEDI
- Posts: 7159
- Joined: Sun Apr 01, 2012 5:26 pm
Re: shapeshifters max v2 build
Nice pictures and great work on your Rostock!
“ Do Not Regret Growing Older. It is a Privilege Denied to Many. ”
-
shapeshifter
- Prints-a-lot
- Posts: 27
- Joined: Tue Oct 14, 2014 11:08 pm
- Location: Somewhere out there.
Re: shapeshifters max v2 build
Thanks Eaglezsoar! I might repost the PSU stuff in the heated bed thread or somewhere else as well and do a few more time trials with different configurations.