Page 1 of 1
The Intimidator
Posted: Wed Apr 08, 2015 11:02 am
by U.S. Water Rockets
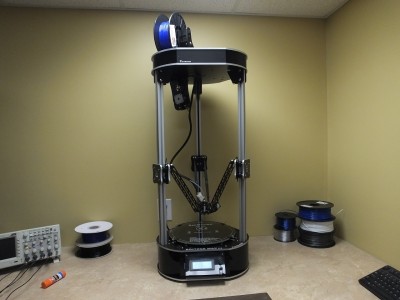
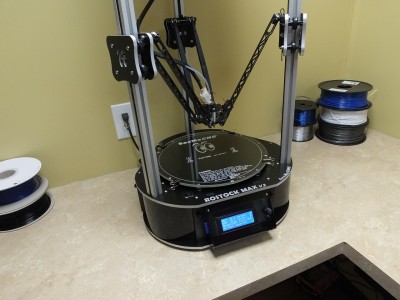
Here's a couple of pictures of our Rostock Max V2, showing the finished printer. We spent the extra time to get the printer built as neatly as practical, and did our own custom color scheme for the melamine parts to bring out the exterior edges with silver accents and black on all interior edges so that the internals and the visible tab edges were not the burnt laser cut color. Painting the edges also takes away the burning leaves smell that the parts gave off. We think it turned out even better than we expected.

- The Intimidator

- Close-up of the custom paint scheme
Re: The Intimidator
Posted: Wed Apr 08, 2015 12:43 pm
by mvansomeren
Very nice! By the way, what do you have against burning leaves? LOL

Re: The Intimidator
Posted: Wed Apr 08, 2015 4:45 pm
by teoman
Do you also make shugar rockets?
Re: The Intimidator
Posted: Wed Apr 08, 2015 8:06 pm
by U.S. Water Rockets
Re: The Intimidator
Posted: Wed Apr 08, 2015 9:52 pm
by Eaglezsoar
I think your printer looks great with the silver edges and highlights.
Thanks for all the pictures and the ones to follow.
Time is valuable and I appreciate that you shared some of yours with us.
Re: The Intimidator
Posted: Wed Apr 08, 2015 9:56 pm
by U.S. Water Rockets
I see you found the photos! Great! Thanks for the reply to the photos. I have a number of 3D printed objects that I will be posting photos of shortly. I'm trying to get the STL files in order so I can share them as well.
Re: The Intimidator
Posted: Fri Oct 16, 2015 1:05 pm
by technut09
Hi team,
What would you say is the best way to go about painting the edges of the parts? Roller, brush or Spraycans?
thanks,
-Steve S.
Re: The Intimidator
Posted: Fri Oct 16, 2015 2:51 pm
by Eaglezsoar
technut09 wrote:Hi team,
What would you say is the best way to go about painting the edges of the parts? Roller, brush or Spraycans?
thanks,
-Steve S.
One of my favorite ways is to use a paint pen, they are available in different colors and I like the Sharpie Bold Paint Pen as
listed here:
http://www.amazon.com/Sharpie-Paint-Mar ... bold+black
Re: The Intimidator
Posted: Fri Oct 16, 2015 6:45 pm
by Jimustanguitar
I stacked my wooden pieces, spaced with construction staples to keep the edges from sticking together, and painted mine with a spray can. I did need to prime the edges first to make the color visible, otherwise the paint just wicks into the wood and is very dark.
http://forum.seemecnc.com/viewtopic.php?f=6&t=4871
[img]
http://i.imgur.com/o3pewaB.png[/img]
[img]
http://i.imgur.com/lQCQbyw.png[/img]
[img]
http://i.imgur.com/k2S7Yhs.png[/img]