I received my Orion today. To my surprise there was no quick start guide (or anything at all besides the printer) and there is no setup information currently on the website. Using what ever clues I can find I am trying to set it up. This is my log of what I have done so that a) if I am doing something wrong someone can hopefully point it out and b) in case I am not the only one without any setup information it may be helpful to others.
The first issue was putting on the filament holder. I was confused because the pictures on the Orion page show the filament and extruder top mounted but the extruder was mounted on the bottom on mine. I figured out that the spool holder was on the bottom left but it wasn't clear how the filament was routed. This was my first attempt
https://www.dropbox.com/s/kicy2tyxh84i4 ... .26.07.jpg
Then I noticed that the one thing by the extruder popped out so this is how it is now
https://www.dropbox.com/s/xw0369pd45wuy ... .30.44.jpg
I think this is how it is supposed to be but it is tough to feed the filament from that angle, stiffer PLA in particular. Anyway if this isn't the filament path let me know.
I then turned on the machine and went though the menus. The card had no PLA prints preloaded so I decided to connect it to my computer and set up the software. I couldn't find the USB plug on the outside so I unscrewed the LCD panel and I saw the board with the USB port. I found I could not plug in the usb without taking off the side panel.
https://www.dropbox.com/s/6da8r2d1dcnjz ... .02.48.jpg
At this point I started using the Rostock Max manual to set up the software.
I downloaded and installed repetier host and the arduino IDE using the SeeMeCNC download page.
I followed the instructions in the manual to install the drivers.
To set up repetier host I went to the git hub site for the Orion and noticed a Quickstart guide folder
https://github.com/seemecnc/Orion_Delta ... 0f7e4b1292 (note:this link probably will change at some point)
This folder had screenshots of what I hope are correct Orion settings. Unfortunately there seems to be some sample gcode that the "save" float over blocks, not sure if it is important.
After setting up the configuration I was able to connect to the printer and control x,y, and z
That is where I am at currently, I have not pushed any filament through or printed anything yet.
More to come.
Orion Setup
Orion Setup
PTMNBN="Printer that must not be named" - a heavily upgraded Replicator 2
-
Eaglezsoar

- ULTIMATE 3D JEDI
- Posts: 7159
- Joined: Sun Apr 01, 2012 5:26 pm
Re: Orion Setup
I thought these came fully assembled with all the firmware in place and all the user had to do was some basic assembly because it was partly disassembled for shipping then the Orion was ready to print.
-
Jimustanguitar

- ULTIMATE 3D JEDI
- Posts: 2608
- Joined: Sun Mar 31, 2013 1:35 am
- Location: Notre Dame area
- Contact:
Re: Orion Setup
I think your doing the right thing by checking out Gene's manual for the regular Rostock setup. Assembly is most of it, but installing Repetier and the things that pertain to third party software should be the same.
Don't do anything to the firmware until you know more about it, but otherwise have fun. Sounds like you'll be printing in the very near future!
Don't do anything to the firmware until you know more about it, but otherwise have fun. Sounds like you'll be printing in the very near future!
Re: Orion Setup
This is correct, it is a functioning printer out of the box with only needing to put the spool holder on (according to rep-host it came with over a day of printing already on it so I know it has been thoroughly tested). That being said 3D printers are not exactly plug and play. I have a replicator 2 with over 500 hours on it so I know a bit about 3D printing and learned the hard way what happens when you are not completely sure what you are doing.Eaglezsoar wrote:I thought these came fully assembled with all the firmware in place and all the user had to do was some basic assembly because it was partly disassembled for shipping then the Orion was ready to print.
https://www.dropbox.com/s/a04sqix3b5mnx ... .52.10.jpg
Firmware fortunately was preloaded so I should be good there until I get to a more experienced level.Jimustanguitar wrote:Don't do anything to the firmware until you know more about it
PTMNBN="Printer that must not be named" - a heavily upgraded Replicator 2
-
Eaglezsoar
- ULTIMATE 3D JEDI
- Posts: 7159
- Joined: Sun Apr 01, 2012 5:26 pm
Re: Orion Setup
I must say that I am surprised that there is not a one or two page tutorial that lists the steps like loading the host and where to get it,
a referral to this forum, a brief introduction to slic3r, installing the Rambo driver.
a referral to this forum, a brief introduction to slic3r, installing the Rambo driver.
Last edited by Eaglezsoar on Sat Oct 05, 2013 3:08 pm, edited 2 times in total.
-
Eaglezsoar
- ULTIMATE 3D JEDI
- Posts: 7159
- Joined: Sun Apr 01, 2012 5:26 pm
Re: Orion Setup
Was there a fan on the peek section of the Hot End?jmpreuss wrote:I received my Orion today. To my surprise there was no quick start guide (or anything at all besides the printer) and there is no setup information currently on the website. Using what ever clues I can find I am trying to set it up. This is my log of what I have done so that a) if I am doing something wrong someone can hopefully point it out and b) in case I am not the only one without any setup information it may be helpful to others.
More to come.

Re: Orion Setup
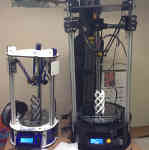
That picture looks like a printer was taken over by The Thing.
Re: Orion Setup
Yes, which is a good thing because I only have PLA at the moment.Eaglezsoar wrote:Was there a fan on the peek section of the Hot End?
Something I forgot to mention in the first post was I won this printer in the giveaway so I'm not sure how different what I got is from what people who purchased it get (for example buyers get a roll of ABS thrown in where I didn't, I don't mind since I like PLA). I doubt however that if there was an instruction sheet available that they would have put that in others but not mine.
I got through software and configuration and calibrating in the manual. I didn't touch the PID stuff since I figured they would have set that before their test prints. Since I am printing in PLA and I doubt they tested with PLA I did do the z height calibration. I did do the end stop test and it showed it might need a little bit of calibration but I'm not going to touch that at the moment, my test prints will probably be small in diameter so I won't worry about that for now. They can't be too far off if they successfully did test prints.
Now its time to search for Slicer configuration instructions as their was no mention of that in the manual.
PTMNBN="Printer that must not be named" - a heavily upgraded Replicator 2
-
Eaglezsoar
- ULTIMATE 3D JEDI
- Posts: 7159
- Joined: Sun Apr 01, 2012 5:26 pm
Re: Orion Setup
Link to Slicr3 manual: https://github.com/alexrj/Slic3r-Manual
Re: Orion Setup
Since the printer comes pre-calibrated, I wouldn't touch _any_ of the firmware or EEPROM settings unless you know precisely what you're doing.
g.
g.
Delta Power!
Defeat the Cartesian Agenda!
http://www.f15sim.com - 80-0007, The only one of its kind.
http://geneb.simpits.org - Technical and Simulator Projects
Defeat the Cartesian Agenda!
http://www.f15sim.com - 80-0007, The only one of its kind.
http://geneb.simpits.org - Technical and Simulator Projects
Re: Orion Setup
Thanks for the link, have downloaded.Eaglezsoar wrote:Link to Slicr3 manual: https://github.com/alexrj/Slic3r-Manual
Since I don't know what nozzle size they used on this machine it looks like I am going to have to take a bit of a pause before I try my first print.
PTMNBN="Printer that must not be named" - a heavily upgraded Replicator 2
Re: Orion Setup
They have the quickstart guide up.
http://download.seemecnc.com/orion/quickstart/#/15
It looks like from the pictures that my machine is slightly different with how the filament feeds (maybe mine was the last beta?).
Hopefully I will be printing tonight!
http://download.seemecnc.com/orion/quickstart/#/15
It looks like from the pictures that my machine is slightly different with how the filament feeds (maybe mine was the last beta?).
Hopefully I will be printing tonight!
PTMNBN="Printer that must not be named" - a heavily upgraded Replicator 2
Re: Orion Setup
hey Jason, they ship with a .5 nozzle. However  Steve was using your machine as a demo, and i think it has a .35! So, check your extrusion diameter, LOL. If you want, we can send you the .5 it was built with
Re: Orion Setup
I did measure it last night and it is a .35 . I guess I wouldn't mind having the .5 in case I need to trouble shoot something I can eliminate having a different nozzle size from stock as the issue (though I presume if Steve was using it as a demo unit that the .35 must work pretty well).johnoly99 wrote:hey Jason, they ship with a .5 nozzle. However
PTMNBN="Printer that must not be named" - a heavily upgraded Replicator 2
Re: Orion Setup
You can get finer trace widths with a .35 for finer details, but are limited to .2mm layers or lower (60% the nozzle hole diameter). With a .5mm nozzle you can do .3mm layers for faster prints with the tradeoff of larger trace widths. Keep in mind these are relative differences in detail too.
I had a spreadsheet setup at one point to see the variances on trace width based on layer height because it will vary between somewhere around the nozzle hole diameter and the width of the nozzle tip itself due to squish. Make sense when you think about how lower layer heights squish the filament more between the previous layer and the nozzle.
I had a spreadsheet setup at one point to see the variances on trace width based on layer height because it will vary between somewhere around the nozzle hole diameter and the width of the nozzle tip itself due to squish. Make sense when you think about how lower layer heights squish the filament more between the previous layer and the nozzle.
Re: Orion Setup
So I had a few headwinds in attempting my first print. I was printing PLA which meant a few things. First I had to adjust the z height since I wasn't heating the bed. The filament temperatures I use on my replicator 2 do not translate to other machines so I had to make a guess at what temperature to run. I also did not have any cooling fan at all for the print itself. Other factors include not being used to the software at all and having to adjust the quickstart profile since I had a .35 nozzle and not a .5.
Anyway in spite of all that this print came out really well, way better than I could have hoped.
https://www.dropbox.com/s/44cj2nn0gnue0 ... .17.07.jpg
The biggest pleasant surprises were that there was no stringing at all between the pillars and that the top didn't get all mushy as I expected since the layers didn't have any time (or have a fan) to cool before the next layer. Very impressed so far.
The print wasn't perfect of course, I was underextruding but that is software, not a hardware issue. I look forward to really pushing it.
Printed using matterhackers grey pla, 190c, no heated bed, hairspray (though I think I going to try glue stick), 30mm/s, 15% infill (which was too low I think).
PTMNBN="Printer that must not be named" - a heavily upgraded Replicator 2
Re: Orion Setup
For PLA I use a little 2oz spray bottle with a 10:1 mix of water to Elmer's White Glue. I heat the bed to 55C and it hasn't failed me yet. Cheaper too. 
If you print PLA fast or print small parts, you really want to get a layer fan added at some point. You can print at *stupidly* high speeds with a good fan attached.
g.
If you print PLA fast or print small parts, you really want to get a layer fan added at some point. You can print at *stupidly* high speeds with a good fan attached.
g.
Delta Power!
Defeat the Cartesian Agenda!
http://www.f15sim.com - 80-0007, The only one of its kind.
http://geneb.simpits.org - Technical and Simulator Projects
Defeat the Cartesian Agenda!
http://www.f15sim.com - 80-0007, The only one of its kind.
http://geneb.simpits.org - Technical and Simulator Projects
Re: Orion Setup
I seem to be struggling with my slic3r settings in dealing with my .35 nozzle. I took the PLA ini file from the quickstart guide and changed the nozzle to .35 and first layer width to .25. This is what I am getting.
https://www.dropbox.com/s/smk2cpap8pbx3 ... .33.44.jpg
The perimeters are great but the base (at the top) is really thin, it nearly broke off when I took it off the build plate. It seems my tops and bottoms are really underextruded, as this really shows
https://www.dropbox.com/s/vc8toxk11si1v ... .30.14.jpg
I can take that calibration cube and look through it.
I'm pretty sure this is a slicer issue and not a mechanical issue. Any insight would be appreciated.
PTMNBN="Printer that must not be named" - a heavily upgraded Replicator 2
Re: Orion Setup
(I can't see the pictures atm)
So here are some tips on settings. It is possible to break these rules and sidestep an issue with creative settings, but these will give you a good starting point.
Extrude a length freely into the air. Measure the diameter of that. Your layer height shouldn't exceed that measurement x .66.
Your minimum layer width shouldn't be less than your nozzle hole diameter. Many people find 10% higher than the nozzle hole diameter to work well for them.
Your actual layer width can (and usually should) increase as your layer height goes does. If it doesn't that means your stretching your filament horizontally and while it may look good visually on the sides, it is still an under-extruding scenario that is likely to run into layer adhesion issues and gaps in the infill. Whether you want to change slicer settings to match is dependent on the slicer. It depends on the slicer used how user entered settings are used, so it can take time to learn the nuances of a slicer.
Also I believe (it's been awhile) for Slic3r you would want to increase the first layer width and it will increase the amount of filament extruded to assist the first layer adhesion.