Page 16 of 17
ED3 hotend tests
Posted: Fri May 31, 2013 6:35 pm
by cambo3d
Using stock seemecnc thermistor only because I couldn't get the thermistor that came with it to stay in the hole reliably. Also, the hole for the heating cartridge was not a very good fit. I had to drill it out so it would fit properly. Also be careful when tightening down the stainless steel parts, I twisted mine on accident. luckily i bought two.
The temperature readings were only about 3 degrees off from the stock hot end setup. I wanted to see how this thing would perform at higher temps so up'ed the maxtemp value to 300c and only got calibrated measured reading of 293c on my thermocouple temp probe. Even though rephost says 299c. The temperature chart seemed to fluctuate more starting at 260C and up. So i'm guessing i need to rerun the pid autotune. Maybe that will smooth it out and get my reading more accurate?? will do when the temps get back to room temp.
Included some photos of the new hot end mounted. At 293c this thing barely gets warm, unlike the stock setup which at 220, i could not comfortably touch the bowden adapter without getting burned. Although, I think I would prefer a higher cfm rated fan. Already on the hunt for one.
temperature probe is inserted all the down inside the tip of the ED3 Nozzle for calibration purposes. Also this turn out to be a little trouble seems as though my thermocouple is not rated for 300c. even though the package says otherwise. I managed to melt the insulation of the sensor somewhat. Hopefully there's not a lot of plastic stuck in there to affect my prints or extrusion. maybe the bits will come out hopefully after a couple of extrusion cycles.
Decided to wrap my hotend up this time with ceramic insulation and kapton tape to keep the radiate heat of the printed parts. and to help stablize temp when part cooling fans running.
random shot of it all mounted up.
Migrating to TL-1 Frame
Posted: Sat Jun 01, 2013 5:41 pm
by cambo3d
Update on mods Ive been working on, migrated them over to the TL-1 frame from Tricklaser.com
My turn adjustable buckle tensioner; proved to be excellent functional mod, must have for the rostock max.
Tricklaser carbon fiber arms; excellent upgrade to improve accuracy and ease of installation. no sanding required.
ED3 all metal hot end; capable of 400c plus. wider range of printing material choices.
Mic 6 build surface; flat build surface ,even heat distribution and non flexing during heating cycles. downside, it takes longer to heat up this massive piece of metal with the onyx. around 10-15min but it holds temperature fairly well.
extended z height; not necessarily for larger printing area. I extended the length to compensate for other mods taking up build space.
hall effect limit switches for more consistent z height repeatability.
Re: Another rostock max build
Posted: Sun Jun 02, 2013 8:46 am
by Eaglezsoar
Very well done and I am jealous.

Now we need to see what kind of prints you can do with that miracle of technology.
It looks like you have 4 points of attachment on the Mic6 heat bed, is it adjustable, like on springs?
That's one big chunk of metal!
Please let us know how she prints with some pictures. Great job!
my hall affect switch mounting solution
Posted: Mon Jun 03, 2013 6:16 pm
by cambo3d
so after much thought and testing this was my final solution. Decided to mount the switch sideways so there would be no chance that the carriage would come in contact with the switch causing damage.
Re: Another rostock max build
Posted: Mon Jun 03, 2013 7:22 pm
by ApacheXMD
Looks great. Still easily adjustable with a wrench at the magnet. How's repeatibilty so far?
Re: Another rostock max build
Posted: Tue Jun 04, 2013 6:08 pm
by cambo3d
ApacheXMD wrote:Looks great. Still easily adjustable with a wrench at the magnet. How's repeatibilty so far?
repeatability is spot on every time, no more fiddling around with screw position. I'm super-satified how they turned out.
ed3/qubd hybrid..
Posted: Wed Jun 05, 2013 12:01 am
by cambo3d
since i bent one of the stainless steel tubes on my ed3, I found this to be a direct fit. Even though not the same and not saying this would be any better.
Qubd hotend has a beefier stainless steel tube and longer. Which would allow a larger size fan mount.
Just experimenting since I had the parts. If it works out be nice to know you could get replacement parts in the USA.
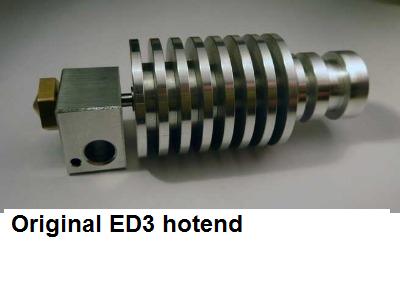
- ed3 stock image.jpg (13.25 KiB) Viewed 17947 times
Re: Another rostock max build
Posted: Wed Jun 05, 2013 1:32 am
by ApacheXMD
with the longer stainless part, you have more of it exposed to open air (as opposed to it being either on the heat sink or heating block), do you think the plastic transition zone will grow? I think heat might creep up the stainless a little bit more since there's no heatsink there.
Re: Another rostock max build
Posted: Wed Jun 05, 2013 10:01 am
by cambo3d
ApacheXMD wrote:with the longer stainless part, you have more of it exposed to open air (as opposed to it being either on the heat sink or heating block), do you think the plastic transition zone will grow? I think heat might creep up the stainless a little bit more since there's no heatsink there.
dont know, like I said just experimenting with it. but here is what the trinity labs hot end looks like. tube is just as long.
pyramid print with the new ed3
Posted: Thu Jun 06, 2013 12:54 am
by cambo3d
came out decent, just a lil more fine tuning. printed in abs, with kisslicer. retraction seems good. Overall pretty excited that I'm getting it dialed in. smaller nozzle seems to make the details better, corners are much sharper.
.25 layer height, 235c for the hotend, 85c for the bed, retraction speed 40, prime 8.5, suck 8, infill hollow, ezstruder, ed3 hotend, tricklaser.com carbon fiber arms.
Re: Another rostock max build
Posted: Thu Jun 06, 2013 1:18 am
by cambo3d
Eaglezsoar wrote:Very well done and I am jealous.
Now we need to see what kind of prints you can do with that miracle of technology.
It looks like you have 4 points of attachment on the Mic6 heat bed, is it adjustable, like on springs?
That's one big chunk of metal!
Please let us know how she prints with some pictures. Great job!
sorry i missed this question.
it takes quite a bit of time to heat that massive piece of metal, took me 10-15min with the onyx to get to 95c even with my upgrades, but holds temperature quite well; too well, takes a long time to cool down also..
I just have it sitting on top of the onyx not bolted down at the moment. I'm going do some more tinkering to see what i can do to cut that time down.
Re: Another rostock max build
Posted: Sat Jun 15, 2013 11:27 am
by Broose
Cambo,
Have you had a chance to run the magnetic arms and compare with the trick laser arms? They both seem like pretty good solutions.
Re: Another rostock max build
Posted: Sat Jun 15, 2013 6:02 pm
by cambo3d
I have xnarons mag arm mod sitting on the shelf at the moment. I don't know if I'll ever try it out. Rostock is printing pretty good at the moment with my trick laser arms for now.
My magnetic arm mod I was working on was put on hold and I don't know if I'll continue working on it.
Re: Another rostock max build
Posted: Wed Jul 03, 2013 2:59 pm
by doctorgonzo
Holy crap dude, you're a badass. I'll probably end up with a rig like yours here soon.
Re: Another rostock max build
Posted: Fri Jul 05, 2013 4:54 am
by cambo3d
doctorgonzo wrote:Holy crap dude, you're a badass. I'll probably end up with a rig like yours here soon.

Re: Another rostock max build
Posted: Fri Dec 20, 2013 10:44 am
by Dust2Dust02
Bump for update!
Re: Another rostock max build
Posted: Thu Dec 26, 2013 11:15 pm
by cambo3d
Dust2Dust02 wrote:Bump for update!
I haven't been using my rostock much lately. New job takes up most of my time..... traveling.
Although I've been looking off and on for a replacement geared stepper motor for the extruder. Just did a quick search on ebay and found this.
http://www.ebay.com/itm/NEMA-17-Geared- ... 76c9d47273
I could probably make an adapter plate so the the ezstruder mechanicals will fit onto it. ahh more projects...no time..
Re: Another rostock max build
Posted: Fri Dec 27, 2013 1:42 pm
by Polygonhell
You might find that stepper doesn't work well with the pololu drivers at 12V, the "important" spec is 4.5mH inductance, that's pretty high, and you may not get anywhere near the rated torque.
Re: Another rostock max build
Posted: Fri Dec 27, 2013 4:14 pm
by cambo3d
Polygonhell wrote:You might find that stepper doesn't work well with the pololu drivers at 12V, the "important" spec is 4.5mH inductance, that's pretty high, and you may not get anywhere near the rated torque.
Thanks....hmmm. know of another geared extruder that might work??
Re: Another rostock max build
Posted: Fri Dec 27, 2013 4:26 pm
by Dust2Dust02
Re: Another rostock max build
Posted: Fri Dec 27, 2013 4:52 pm
by cambo3d
sorry for the confusion. That's not what im looking for.. i'm looking for an geared stepper motor only.. not an extruder. Meant to say geared stepper motor.
so maybe found a replacement geared stepper
Posted: Fri Jan 10, 2014 4:45 pm
by cambo3d
http://www.ebay.com/itm/ALL-METAL-ROSTO ... 27daa2211f
geared stepper motor which is what i was looking for. bonus also comes with all metal bowden setup. (im a sucker for cnc machined parts. Just take my money.. )
gonna give this a shot and see how it works out.
Re: so maybe found a replacement geared stepper
Posted: Fri Jan 10, 2014 5:05 pm
by Eaglezsoar
Expensive but it should last a lifetime with that all metal extruder. The first all metal extruder I've seen.
Let us know how it works out for you.
new extruder..
Posted: Thu Jan 23, 2014 4:59 pm
by cambo3d
Finally got around to picking up my new extruder from the post office.
Looks a lot bigger in the photos than in person. It uses a nema 11 kysan stepper motor with a planetary gearbox. Quality and machine work look excellent.. although I'm not sure I like the design of set screws as an adjustment point for roller the bearing. May replace those with something else.. will see.....
I'll post my thoughts once its all setup..
Re: new extruder..
Posted: Thu Jan 23, 2014 5:25 pm
by Eaglezsoar
cambo3d wrote:Finally got around to picking up my new extruder from the post office.
Looks a lot bigger in the photos than in person. It uses a nema 11 kysan stepper motor with a planetary gearbox. Quality and machine work look excellent.. although I'm not sure I like the design of set screws as an adjustment point for roller the bearing. May replace those with something else.. will see.....
I'll post my thoughts once its all setup..
This looks like a nice one. Please let us know how well it works out for you.