Another rostock max build

Re: Another rostock max build
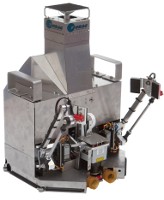
im getting them from seemecnc
My rostock build log http://forum.seemecnc.com/viewtopic.php?f=42&t=1228
-
MorbidSlowBurn

- Printmaster!
- Posts: 169
- Joined: Sun Mar 03, 2013 5:33 pm
Re: Another rostock max build
kudos, to seemecnc, they are shipping a replacement set for my misaligned parts. I ordered a frame set from tricklaser.com to try out also, Might actually end up with 2 rostocks after i'm done building..
Reflecting back on ideas that I put a hold to, I've been working on modified upper idler belt tensioner mounts so I can get my turnbuckle idea to work. http://forum.seemecnc.com/viewtopic.php ... 8&start=90 Still plan to use off the shelf parts. Stock mount works but if you tighten the screw to much is damages the melamine. With this setup it shouldn't do that.
If anyone wants a set. I'll see if can get someone to cut a larger run of these after I've tested them. I can put together a plug and play kit or you can have someone laser cut a set for you. I'll post the final dxf file here and other parts needed. Once everything is tested.
Reflecting back on ideas that I put a hold to, I've been working on modified upper idler belt tensioner mounts so I can get my turnbuckle idea to work. http://forum.seemecnc.com/viewtopic.php ... 8&start=90 Still plan to use off the shelf parts. Stock mount works but if you tighten the screw to much is damages the melamine. With this setup it shouldn't do that.
Last edited by cambo3d on Thu Apr 04, 2013 1:18 am, edited 6 times in total.
My rostock build log http://forum.seemecnc.com/viewtopic.php?f=42&t=1228
Re: Another rostock max build
Good for seemecnc! Sucks that you have to build it all over again but at least it should be flat and straight this time around. I like all the tensioner ideas too. Keep it up! (so i can steal them 
-
Eaglezsoar

- ULTIMATE 3D JEDI
- Posts: 7159
- Joined: Sun Apr 01, 2012 5:26 pm
Re: Another rostock max build
Do you have any ideas of what to make the new part from? I would be interested in purchasing a set if they become available.cambo3d wrote:kudos, to seemecnc, they are shipping a replacement set for my misaligned parts. I ordered a frame set from tricklaser.com to try out also, Might actually end up with 2 rostocks after i'm done building..
Reflecting back on ideas that I put a hold to, I've been working on modified drawings for the upper idler belt tensioner mounts so I can get my turnbuckle idea to work. http://forum.seemecnc.com/viewtopic.php ... 8&start=90 Still plan to use off the shelf parts. Stock mount works but if you tighten the screw to much is damages the melamine. With this setup it shouldn't do that. I'll see if can get someone to cut a larger run of these so if anyone wants a set, I can get a plug in play kit together.
Carl
Re: Another rostock max build
same melamine as the rostock
My rostock build log http://forum.seemecnc.com/viewtopic.php?f=42&t=1228
-
Eaglezsoar
- ULTIMATE 3D JEDI
- Posts: 7159
- Joined: Sun Apr 01, 2012 5:26 pm
Re: Another rostock max build
Why would this new configuration not be damaged as you tighten the screw if it is made from the same material?cambo3d wrote:same melamine as the rostock
Re: Another rostock max build
with the stock setup you have to tighten down the screw against the melamine in order to keep the idler tensioner in place and it damages the melamine if you over tighten it. With this setup, you actually have to keep the screws that hold the idler tensioner loose so you can adjust the tension via the turnbuckle.
here's what mine looks like.
here's what mine looks like.
My rostock build log http://forum.seemecnc.com/viewtopic.php?f=42&t=1228
Re: Another rostock max build
teaser ... another add on i'm working on..
Haven't decided if I will use all 6 or just 3, these are some pretty blinding leds at 1 watt a piece!! I'll be adding a variable pot for adjustable light intensity. I'm using aluminum because it doubles as a mounting plate and heat sink. Mount uses stock mounting hole locations. plug-n-play design
milled aluminum led mounting plate and leds
Last edited by cambo3d on Tue Apr 02, 2013 11:47 pm, edited 4 times in total.
My rostock build log http://forum.seemecnc.com/viewtopic.php?f=42&t=1228

Re: Another rostock max build
Gee, that looks like it'd be a quick print. Does it need to be aluminum?
- dan
- dan
Re: Another rostock max build
went to home depot today and while I was there I picked some of this ptfe dry lube in a spray can. Placed it on all my joints and the difference was night and day. Might even work good for the moving parts in the extruder to get rid of some of the squeaks, just dont get it on the filament roller.
My rostock build log http://forum.seemecnc.com/viewtopic.php?f=42&t=1228
Better way to get your extrusions aligned properly
I thought I'd share this with everyone since there has been some confusion on how much gap to have between the extrusion and the frame. I am in the process of reassembly and I might as well show you how i did it. Following procedures assume you have checked your laser cut parts and all are aligned properly.
for this to work part numbers 68351 (base table top), 68368 (top support plate), and 68369 (TOP IDLER MOUNTS, check hole alignment) need to be perfectly the same. Sand if you need to square them up. photo shown below of the two circular plates stacked on top of each other. yes i know my spelling is wrong.
Once your ready to install the aluminum extrusions here's how to get them perfectly the same height. installation bolts are installed snug but not tightened yet at this point. If you dont have an extra t-slot nut, use whatever that fits in that hole.
WHATEVER, you used here make sure that the material is snug against the extrusion. (note: this assumes that all your extrusions are the same length also, check before you proceed)
install the screw that holds the top support plate to the extrusion, its one single screw held in by an anchor nut on the other side. (you can do this step before hand also, i just chose to put it here in the write up)
Once the above has been done. Grab the feeler gauges, flat automotive type, you get these from any autoparts store, I got mine from advance auto parts.
use the feeler gauge as space gauge. Press the extrusion against it and tighten up the bolts for the bottom. (select a feeler gauge that will give you the same space for the bottom and the top, mine came out to be .024in or .610mm)
next go to the top, and do the same thing. once you have the space correct tighten down the bolts.
Now repeat this procedure for the other two towers.
Once done all three towers will be at the same height and perpendicular to each other. Oh yeah, DONT FORGET TO REMOVE YOUR ALIGNMENT TOOLS (IE. T-SLOT NUT THAT YOU USED TO ALIGN THE BOTTOM AND THE MATERIAL YOU USED TO ALIGN THE TOP
for this to work part numbers 68351 (base table top), 68368 (top support plate), and 68369 (TOP IDLER MOUNTS, check hole alignment) need to be perfectly the same. Sand if you need to square them up. photo shown below of the two circular plates stacked on top of each other. yes i know my spelling is wrong.
install the screw that holds the top support plate to the extrusion, its one single screw held in by an anchor nut on the other side. (you can do this step before hand also, i just chose to put it here in the write up)
use the feeler gauge as space gauge. Press the extrusion against it and tighten up the bolts for the bottom. (select a feeler gauge that will give you the same space for the bottom and the top, mine came out to be .024in or .610mm)
Once done all three towers will be at the same height and perpendicular to each other. Oh yeah, DONT FORGET TO REMOVE YOUR ALIGNMENT TOOLS (IE. T-SLOT NUT THAT YOU USED TO ALIGN THE BOTTOM AND THE MATERIAL YOU USED TO ALIGN THE TOP
Last edited by cambo3d on Fri Apr 05, 2013 3:25 pm, edited 8 times in total.
My rostock build log http://forum.seemecnc.com/viewtopic.php?f=42&t=1228
Re: Another rostock max build
I recommend to measure the height.
Re: Another rostock max build
it is measured, they all measured the same. And you can do this once your done aligning all the towers just to double check.
Everything should measure the same if all your laser cut parts are aligned like I stated earlier.
Everything should measure the same if all your laser cut parts are aligned like I stated earlier.
Last edited by cambo3d on Fri Apr 05, 2013 2:32 am, edited 1 time in total.
My rostock build log http://forum.seemecnc.com/viewtopic.php?f=42&t=1228
Re: Another rostock max build
Ok, great. I aligned with the marks and it was few mm off, when measuring.
New all metal hotend retrofit
new hotend that will get retrofitted into my max. I've been following the development of metal hotends and this one is now available for purchase. One downside depending on how you look at it, is that it uses 3mm filament at the moment. 1.75mm will be available at a later date.
hot end can print Nylon, Polycarbonate, PLA, ABS, LayWood, PVA, HDPE and just about any type of filament there is currently available on the market. no PTFE or plastic is used in the hot end and it is safe up to 400C. currently available at http://trinitylabs.com/products/trinity ... emp-hotend
hot end can print Nylon, Polycarbonate, PLA, ABS, LayWood, PVA, HDPE and just about any type of filament there is currently available on the market. no PTFE or plastic is used in the hot end and it is safe up to 400C. currently available at http://trinitylabs.com/products/trinity ... emp-hotend
Last edited by cambo3d on Fri Apr 05, 2013 12:42 pm, edited 4 times in total.
My rostock build log http://forum.seemecnc.com/viewtopic.php?f=42&t=1228
-
Eaglezsoar
- ULTIMATE 3D JEDI
- Posts: 7159
- Joined: Sun Apr 01, 2012 5:26 pm
Re: Another rostock max build
Great job on the pictures and the explanation! This certainly has to be the best way to install the extrusions, the idea of using the t-nut on its side at the bottom was brilliant!
Thanks for writing this up, I am just at the point of installing the uprights and this is a godsend.
Could you say where those hotends are available?
Carl
Thanks for writing this up, I am just at the point of installing the uprights and this is a godsend.
Could you say where those hotends are available?
Carl
Re: Another rostock max build
sorry, updated link in my post
glad someone found this idea helpful. =)
glad someone found this idea helpful. =)
My rostock build log http://forum.seemecnc.com/viewtopic.php?f=42&t=1228
-
foshon

- Printmaster!
- Posts: 600
- Joined: Fri Mar 08, 2013 3:05 pm
- Location: Just to the right of SeeMeCNC
Re: Another rostock max build
Do you have a method of attaching the hot-end in mind?
Purple = sarcasm
Please do a board search before posting your question, many have been answered with very time consuming detail already.
Please do a board search before posting your question, many have been answered with very time consuming detail already.
Re: Another rostock max build
making a jhead adapter to fit our rostock platform.
My rostock build log http://forum.seemecnc.com/viewtopic.php?f=42&t=1228
-
Eaglezsoar
- ULTIMATE 3D JEDI
- Posts: 7159
- Joined: Sun Apr 01, 2012 5:26 pm
Re: Another rostock max build
Be sure to let us know how that Hot-End works, they should all be made like that...without the Peek or othercambo3d wrote:making a jhead adapter to fit our rostock platform.
parts that can melt. That was a good find, the only other ones I've seen made like that come from England.
Carl
-
Eaglezsoar
- ULTIMATE 3D JEDI
- Posts: 7159
- Joined: Sun Apr 01, 2012 5:26 pm
Re: Another rostock max build
I just installed my uprights using your tips and everything came out perfect without trying to eyeball the lines and screwing around.cambo3d wrote:sorry, updated link in my post
glad someone found this idea helpful. =)
I highly recommend your method for anyone building the Rostock Max. Thank you for sharing these ideas with us. I'm not going to
mention a change to the "manual" but if anyone from SeemeCNC reads this thread they should consider this method of installing the
extrusions as the official method and document it as such.
Carl
-
foshon
- Printmaster!
- Posts: 600
- Joined: Fri Mar 08, 2013 3:05 pm
- Location: Just to the right of SeeMeCNC
Re: Another rostock max build
Purple = sarcasm
Please do a board search before posting your question, many have been answered with very time consuming detail already.
Please do a board search before posting your question, many have been answered with very time consuming detail already.
Re: Another rostock max build
Will definitely let you guys know how the hotend works out. Carl thanks for the compliment, Hopefully this will help a lot of people.
foshon i've downloaded a couple of rostock j-head adapter stls. That one I dont have yet. Will have to try them to see which works best or make one of my own.
foshon i've downloaded a couple of rostock j-head adapter stls. That one I dont have yet. Will have to try them to see which works best or make one of my own.
My rostock build log http://forum.seemecnc.com/viewtopic.php?f=42&t=1228
-
Eaglezsoar
- ULTIMATE 3D JEDI
- Posts: 7159
- Joined: Sun Apr 01, 2012 5:26 pm
Re: Another rostock max build
I have a Budasnozzle, do you think that this part would allow me to use it on the the Rostock?
I can't print it yet but getting closer.
Carl