Put another 4.5 hours into it tonight, bringing me up to 11.5 hours total so far.
I didn't end up doing the wires last night... I was too lazy. They took me about an hour to get done today. It was actually pretty difficult for me to get them through. The easiest was the 18ga wires because they're pretty stiff and wanted to go in a straight line down the tube. The second most difficult was the 22ga wire, because theres a lot of them in that little tube and they wanted to keep bunching up. The end stop wires were the things nightmares are made of. I don't know how they expect you to get those through in pairs... I only got the first pair through together. The rest I had to do one by one and in order to prevent bunching I used the wires which were already pulled through to coax the rest through. I basically pulled as much wire as I could to the end I was feeding from, then started feeding the next wire. Once I felt the resistance of the wire pushing back I started pulling the existing wires back through the other side in short bursts as I fed the new wire in. This helped significantly to pull the new wires through and I continued that shuffling act until everything was through. It was a massive pain but I did it.
Here's all the towers in place with their wiring:
[img]
http://staticexperiment.com/rostock/DSCN0152s.jpg[/img]
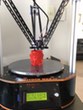
Next came the top... nothing really to talk about here... but here it is, complete with end stop switches and T nuts:
[img]
http://staticexperiment.com/rostock/DSCN0160s.jpg[/img]
Actually... let me complain a little more about the manual, even though geneb is redoing it... (sorry lol) The manual did not mention that the tower supports for the top look completely different now until
after all the instructions regarding them. I almost panicked again thinking I was missing pieces. Once I read further down I noticed the tiny little insert saying they changed them... but I nearly went crazy. I still haven't learned my lesson... that if I just read a bit more ahead usually all my questions get answered

Next up is the inside cheapskate assemblies. The manual was very confusing about this part. It says that you should line the inside and outside pieces up to make sure you have the correct orientation, and tells you to do it by making the eyes look to the right. That's simple enough.... but then it doesn't tell you which side of the inside plate you're actually supposed to install the u-joint base to. Without having prior knowledge for what this part is for or where it will end up once completely assembled its difficult to understand that it should be on the inner side of the inside plate. It's also over-complicating the whole matter. Seeing as the 2 holes towards the top of the plate are at different positions, a much simpler explanation to the correct orientation would be to simply tell the user to lay the inside plate flat with the hole closer to the top on the right. That's a sure fire way to make sure its in the right position to attach the u-joint base. It also simultaneously identifies to the user which side is the top because the bottom 2 holes are directly across from each other.
So instead of trying to figure out the orientation in relation to other pieces, just simply lay it down so that the hole closest to the top is on the right. You can see this in the picture below (which also happens to have the completed u-joint assembly)
[img]
http://staticexperiment.com/rostock/DSCN0161s.jpg[/img]
You can also see the skates in the background there.... Those were a pain too. My fingers still hurt from pressing those all together. I don't know what the tolerance is typically supposed to be on those, but it was extremely extremely tight on some of mine. I actually had to place one of them on the floor and stand on it to get it on. I mean, I know I'm not very strong but damn were these tough.
And here we see the completed cheapskate assemblies mounted on the towers:
[img]
http://staticexperiment.com/rostock/DSCN0165s.jpg[/img]
That's all for tonight... This portion of the build really tired me out! I didn't even bother to adjust the tension on the carriages yet, I'll do it tomorrow. So much struggling tonight, but I got through it. I'm a little sad that I couldn't complete it in 3 days like I wanted (I'm working fewer hours per day than anticipated), but I'm guessing I should have the rest done tomorrow night (hopefully)