Easily adjustable belt tensioners for Rostock Max V2???

A place to talk about user-made mods and upgrades to their machines
atoff
Printmaster!
Posts: 277
Joined: Sun Mar 30, 2014 5:24 pm

Re: Easily adjustable belt tensioners for Rostock Max V2???

Post by atoff »

Awesome, glad you're still working on it, I kind of fizzled. :D Kept getting sidetracked, then discouraged. I like your design, I wasn't sure if that little piece would have enough integrity to support the tension, but considering it'll be sandwiched inbetween the top plate, I think that would reinforce it enough, so that should work! As for the wires coming out of the towers. I had actually cut a slot out of mine. Printed it, tested it, and it fit perfectly.

[img]http://i.imgur.com/zjBIQRZ.jpg[/img]

Look forward to hearing back as to whether this one works, rev20 is hopefully the one!
esbowman
Printmaster!
Posts: 68
Joined: Fri Apr 18, 2014 11:25 pm

Re: Easily adjustable belt tensioners for Rostock Max V2???

Post by esbowman »

I thought about cutting a notch too. Yours looks so much better. :)

I'm a little unsure about the little piece at the top too. Hoping it will have enough strength. I just looked and I'm actually up to version 24. Lol
esbowman
Printmaster!
Posts: 68
Joined: Fri Apr 18, 2014 11:25 pm

Re: Easily adjustable belt tensioners for Rostock Max V2???

Post by esbowman »

Btw, what modeling software are you using? I have Cinema 4D, and Autocad on my Mac but have been looking into Inventor or Modo. I'm usually working on the creative side of things for my business (motion graphics, illustration, animation) but would like to find something more suitable for solid modeling and product design.
atoff
Printmaster!
Posts: 277
Joined: Sun Mar 30, 2014 5:24 pm

Re: Easily adjustable belt tensioners for Rostock Max V2???

Post by atoff »

I think it'll work... I like your design, it's cleaner, and less bulky. It would be a simple fix if it seems like there's too much force being applied to the top piece, which I really don't think will be an issue.

I'm using Solidworks 2014. I've never tried Cinema 4D, but I'm pretty sure Solidworks would be much easier to use, especially for this type of thing.
User avatar
nitewatchman
Printmaster!
Posts: 624
Joined: Thu May 01, 2014 9:51 pm
Location: Birmingham, Alabama

Re: Easily adjustable belt tensioners for Rostock Max V2???

Post by nitewatchman »

The tensioners are looking better with every iteration. These will be a real asset to the machines and will prevent the bearing screws from chewing up the upright when they have been tighten several times.

Great work!

nitewatchman
esbowman
Printmaster!
Posts: 68
Joined: Fri Apr 18, 2014 11:25 pm

Re: Easily adjustable belt tensioners for Rostock Max V2???

Post by esbowman »

Thanks man. It will happen. Version 25 printing now. Lol
esbowman
Printmaster!
Posts: 68
Joined: Fri Apr 18, 2014 11:25 pm

Re: Easily adjustable belt tensioners for Rostock Max V2???

Post by esbowman »

Version 26 is a winner?

I'll let you all be the judge of that, but I do have it successfully installed and the acrylic cover fits!

So, I'm attaching the STL files here. I'm using Slic3r for this with ABS obviously. It took about 2-3 hours to print, but I set my speed pretty low.

Hardware you'll need for this to work:

Qty. 6 — 8-32 x 1" long Thumb (Spade) Screws, or other similar thumbscrew. Bought mine here. http://www.ebay.com/itm/331133117348
Qty. 6 — 8-32 Nylon Lock Nuts. These are for the thumbscrews listed above.
Qty. 3 — 6-32 x 2" long Pan Phillips Machine Screws. These are slightly longer screws to replace the bearing screws.
Qty. 3 — 6-32 Nylon Lock Nuts. (Can simply reuse what you have.)

I wanted something that would install easily, allow easy adjustment, and minimize risk of damage to the printer. The top bracket installs by simply removing the nylon thumbscrew at the top of each tower. Once removed you'll notice that the top tensioner bracket will slide right into the gap that is present between the top melamine plate and the horizontal support for the tower supports.

Before you do anything, please take the time to file out the holes if needed, file the top piece where the support was printed, and build it all prior to installing. You want the thumbscrews to slide freely, and you DO NOT want them to thread the holes.

Once you have successfully dry fit everything, leave everything together except for the bearing screw. You want to install it with the top bracket and smaller bearing brackets together already, or else you'll find it's nearly impossible to install the thumbscrews after the fact. Slide the partially assembled tensioner bracket into the gap at the top of the tower supports, and tighten the Nylon Thumbscrew (original top screw). This will tighten the top tensioner bracket and hold it in place. Note: I made the hole slotted to allow some play, so you should be able to position it inward or outward to align the bearing bracket holes.

Now insert the 2" 6-32 screw through the left or right bearing bracket and the bearing assembly. Use the 6-32 nylon locknut on the other side and tighten it with a screwdriver. Make sure you don't over tighten it though. It really needs to be just tight enough so that the smaller bearing brackets do not have a huge gap between the melamine tower supports, and loose enough to allow the whole assembly to move up and down once you tighten the adjustment screws.

Adjust the thumbscrews now until the belt is tight. Once you feel it's tight enough, you can now tighten the bearing screw a little more. Don't overdue it though.

Photos:
File away the residual support material.
Installing nuts into top bracket. Use a screw to help press it in place.
Top bracket with nuts installed. Notice the slots inside each side wall. This is to allow the bearing brackets to move up and down, but limit rotation.
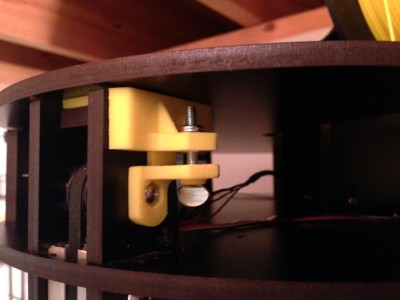
Right side view. Note the smaller brackets are different. One is left and one is right.
Front view of tensioner installed.
Files:
Here's the STL file, and I'll call it V.026. ;) I used Slic3r for this, and other than having to slightly file off burs from the support material, and opening up a few of the holes, it all fits pretty well. I'm not sure if my machine is 100% calibrated though, so you might need to adjust the scale of this in Repetier by a very small amount if you notice a poor fit. One other thing, you'll notice that I modeled the support material in the STL file. After 25 versions I figured out it was best to not rely on Slic3r to add support material. It should snap right off and you'll just need to sand or file where it was in place. If you guys feel you want it without the support material modeled, just let me know and I'll post an alternate.
rostock max v2 belt tensioner v26.stl
Rostock Max 2 - Belt Tensioner by Eric Bowman - v.026
(141.68 KiB) Downloaded 537 times
Finally, I'm open to suggestions on how I can make this even better. I'm pretty happy with it right now, and time will tell if it holds up. Fingers crossed. Please let me know if you have any luck with this, and please post pics of it installed. If all goes well and you all like it, I'll eventually throw it up on Thingiverse.

Have a great Memorial weekend. I hope you all get the time to print some of these and post pics. :D
Last edited by esbowman on Sat May 24, 2014 12:12 pm, edited 1 time in total.
User avatar
apostoly
Printmaster!
Posts: 142
Joined: Fri Mar 07, 2014 6:01 pm
Location: Sydney Australia

Re: Easily adjustable belt tensioners for Rostock Max V2???

Post by apostoly »

Excited to try this out!!!

Will be printing shortly :D

Thanks for putting in so much effort
User avatar
Eaglezsoar
ULTIMATE 3D JEDI
Posts: 7159
Joined: Sun Apr 01, 2012 5:26 pm

Re: Easily adjustable belt tensioners for Rostock Max V2???

Post by Eaglezsoar »

Very good work, thanks for sharing!
“ Do Not Regret Growing Older. It is a Privilege Denied to Many. ”
atoff
Printmaster!
Posts: 277
Joined: Sun Mar 30, 2014 5:24 pm

Re: Easily adjustable belt tensioners for Rostock Max V2???

Post by atoff »

Nice job, hopefully I can get the parts ordered soon and give it a try! Definitely thanks for sharing.
esbowman
Printmaster!
Posts: 68
Joined: Fri Apr 18, 2014 11:25 pm

Re: Easily adjustable belt tensioners for Rostock Max V2???

Post by esbowman »

Just a quick note guys, I was able to get all of the hardware from Lowe's EXCEPT the thumbscrews. After looking at the spade type thumbscrews, it MIGHT be better to use a knurled thumbscrew similar to this https://www.unicorpinc.com/images/WEB%2 ... l-%20B.jpg. Really any thumbscrew would probably work if the size and thread is the same. The spade type might allow you to tighten/loosen it easier, but I think overtime it could "eat" into the ABS plastic. Probably nothing to worry about though, as I don't see myself adjusting it constantly.

I would rummage through the hardware bins and see if any of the home improvement stores have something similar.

Good Luck!
atoff
Printmaster!
Posts: 277
Joined: Sun Mar 30, 2014 5:24 pm

Re: Easily adjustable belt tensioners for Rostock Max V2???

Post by atoff »

Yeah, I'm actually looking through Lowes right now. I think i'm going to go with 8-32 allen socket cap screws. Although it won't be as convenient as a thumb screw, it's cheap and readily available.
esbowman
Printmaster!
Posts: 68
Joined: Fri Apr 18, 2014 11:25 pm

Re: Easily adjustable belt tensioners for Rostock Max V2???

Post by esbowman »

Yup. You might have to cut off an Allen wrench to be able to fit it but that should work fine.
atoff
Printmaster!
Posts: 277
Joined: Sun Mar 30, 2014 5:24 pm

Re: Easily adjustable belt tensioners for Rostock Max V2???

Post by atoff »

For some reason the supports didn't print, came back to a tangled mess of black ABS. :/

Btw- I truly hate ABS. Can't wait to get the E3D's working so I can print Nylon.
esbowman
Printmaster!
Posts: 68
Joined: Fri Apr 18, 2014 11:25 pm

Re: Easily adjustable belt tensioners for Rostock Max V2???

Post by esbowman »

Bummer. What temp were you using for the nozzle and bed? I usually run it around 220C for the nozzle and 90-95C on the bed. My inclination is that you had it going too fast? The supports had a little stringing for me, but overall they printed great.
atoff
Printmaster!
Posts: 277
Joined: Sun Mar 30, 2014 5:24 pm

Re: Easily adjustable belt tensioners for Rostock Max V2???

Post by atoff »

Yeah, I mean there were NO supports. lol It didn't even attempt to print them. I see them in Cura and Slic3r, you've included them, and they're there. It just ignored them.

But my temps anyway were 230c for the nozzle and 90c for the bed. I just switched to ABS for the first time since printing my fan shrouds initially. Had a hell of a time getting temps to reach 230. I printed the fan shrouds at 225, but this time the nozzle temp wouldn't hold, so I had to kick it up to 240, which gave me 230.
esbowman
Printmaster!
Posts: 68
Joined: Fri Apr 18, 2014 11:25 pm

Re: Easily adjustable belt tensioners for Rostock Max V2???

Post by esbowman »

Ahhhh. Gotcha. Are you using Repetier? I assume so. When I click on the Slic3r button it takes a while and then I see the path visualization in Repetier which shows all the supports as though they will be printed.

I read somewhere that Slic3r will not recognize anything smaller than .39mm. I have my printer settings in Slic3r set to .5mm for the nozzle. The other thing is that I always use the button inside Repetier to slice the models, instead of using the standalone version of Slic3r. Not sure if that makes a difference.
User avatar
nitewatchman
Printmaster!
Posts: 624
Joined: Thu May 01, 2014 9:51 pm
Location: Birmingham, Alabama

Re: Easily adjustable belt tensioners for Rostock Max V2???

Post by nitewatchman »

Printed one to try. I had 8-32 Socket Heads and used them.

V26 adjusts positively and easily. I LIKE IT!

Banging away on 2 more now.


nitewatchman
atoff
Printmaster!
Posts: 277
Joined: Sun Mar 30, 2014 5:24 pm

Re: Easily adjustable belt tensioners for Rostock Max V2???

Post by atoff »

esbowman wrote:Ahhhh. Gotcha. Are you using Repetier? I assume so. When I click on the Slic3r button it takes a while and then I see the path visualization in Repetier which shows all the supports as though they will be printed.

I read somewhere that Slic3r will not recognize anything smaller than .39mm. I have my printer settings in Slic3r set to .5mm for the nozzle. The other thing is that I always use the button inside Repetier to slice the models, instead of using the standalone version of Slic3r. Not sure if that makes a difference.
Yeah, I was rushing and didn't check the G-Code visually. It showed your supports in the model preview, so I disabled adding supports in Cura, not sure how that worked out that it didn't print them, but after re-enabling supports in Cura, all looked normal. I'll have to try printing tomorrow, as I want to take a break from the ABS smell. Modeling a bracket for dual EZStruders at the moment, it's a mess. lol
esbowman
Printmaster!
Posts: 68
Joined: Fri Apr 18, 2014 11:25 pm

Re: Easily adjustable belt tensioners for Rostock Max V2???

Post by esbowman »

nitewatchman wrote:Printed one to try. I had 8-32 Socket Heads and used them.

V26 adjusts positively and easily. I LIKE IT!

Banging away on 2 more now.


nitewatchman
Awesome. Good to hear!
User avatar
gajtguy
Printmaster!
Posts: 126
Joined: Sat Apr 26, 2014 9:00 pm

Re: Easily adjustable belt tensioners for Rostock Max V2???

Post by gajtguy »

atoff wrote:Yeah, I mean there were NO supports. lol It didn't even attempt to print them. I see them in Cura and Slic3r, you've included them, and they're there. It just ignored them.
Same problem over here (no support after CURA). Stopped the print about 5 layers in (once I woke up to the fact that an issue was going to happen eventually). I am using Cura 14.03 and I can't seem to find a setting that will allow your built in supports to work. So I'm trying again with the Support Type enabled for 'touching buildplate'.

Looking forward to trying this out though. And I've got the entire week off. So time to tweek...
esbowman
Printmaster!
Posts: 68
Joined: Fri Apr 18, 2014 11:25 pm

Re: Easily adjustable belt tensioners for Rostock Max V2???

Post by esbowman »

Hmmm. If you guys can find what Curas minimum wall thickness is, I could make a version with slightly fatter walls. Or you could just try Slic3r?

Alternatively, would it help you if I posted the Gcode I used?
atoff
Printmaster!
Posts: 277
Joined: Sun Mar 30, 2014 5:24 pm

Re: Easily adjustable belt tensioners for Rostock Max V2???

Post by atoff »

I just added my own supports... enabling supports in Cura works just fine. I'm getting really ugly prints under the supports though, I need to figure out what's going on, Maybe I need to increase the amount of fill on the supports, but they looks awful. I haven't tested yet, but the design looks solid. I think I'll switch to PLA and do the 3 sets tomorrow. No reason ABS must be used on this.
User avatar
forrie
Printmaster!
Posts: 159
Joined: Wed Apr 16, 2014 7:15 am
Location: Crab Nebula

Re: Easily adjustable belt tensioners for Rostock Max V2???

Post by forrie »

Cool...I'm printing these now. The first one came out really nice! Just need to wait for the screws/nuts to turn up in the mail so I can try it out, but a quick test fit shows it should work out just fine:)
I'm not an alcoholic...I'm Australian!
esbowman
Printmaster!
Posts: 68
Joined: Fri Apr 18, 2014 11:25 pm

Re: Easily adjustable belt tensioners for Rostock Max V2???

Post by esbowman »

forrie wrote:Cool...I'm printing these now. The first one came out really nice! Just need to wait for the screws/nuts to turn up in the mail so I can try it out, but a quick test fit shows it should work out just fine:)
Awesome. Hope it works out well for you. :)

Atoff, I thought PLA was more brittle but this is my first printer and I've ONLY printed in ABS so far. Admittedly a newbie. :)
Post Reply

Return to “Mods and Upgrades”