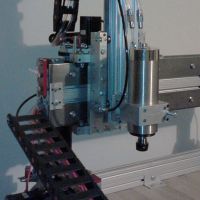
Fan for Barrel Cooling
Some materials, PLA in particular, exhibit "melt creep". This phenomenon results in molten material working its way up from the hot end (nozzle) into the barrel and, in some cases, even all the way up to the filament entry point into the extruder. This is not good! The goal is to have a small melt zone with solid (i.e. unmelted) filament behind it to effectively push the filament through the nozzle. Once molten filament makes its way up to the cold zone (the PEEK section on typical extruders) it can harden or compress and jam your extruder. As mentioned above, PLA is nearly impossible to print without an effective cool zone to prevent this creep from occurring.
Most people have not really thought about the dynamics of heating/cooling the nozzle/hotend. Very little airflow pointed directly at the PEEK (25mm fan) is all that is required to lower the temperature by at least 20°C. Too much air, or air directed at the hot end/nozzle is only going to create problems for the PID to keep the hot end at the set point and use more power than necessary. You can use Kapton tape or aluminum foil shield to isolate the hot end if needed. Please consider using the right size fan for the job, bigger is not necessarily better and can make the situation worse.
NOTE: The way the Rostock delta head is designed, the spacers are exactly 1" tall so a 25mm fan slides right in. The lower part of the platform where the delta arms are attached makes a great "wind brake" to keep the fan on the PEEK and not the nozzle.
And as Polygonhell states "don't forget to retune your PID settings after you add a fan (with the fan on of course)."
It is perfectly fine to run the fan at all times. You will find that the PEEK barrel will stay nice and cool and you won't have problems with other materials. Higher melting temp materials like Taulman nylons (there are 2 types now) require higher melt temps - right at the lower limit for melting the PEEK - so the fan provides a degree of safety for these materials. I have my fan wired to a simple on/off switch and leave it on all the time when printing. I've had absolutely no clogs or issues printing PLA.
Certain materials like PLA remain plastic for a long time. Part geometry and infill also have an effect on the duration of this plastic state. There is a fine tradeoff between cooling a part so that it does not warp or distort and keeping it warm enough so the next layer can effectively bond to the previous layer. Excessive cooling can also CAUSE parts to warp and delaminate due to built up shrinkage stress in the printed part. ABS is particularly notorious for this since it has considerable shrinkage upon cooling.
But don't despair! It is actually quite simple to learn how to deal with this printing challenge. It does take a little experimentation and experience but once you understand it, you can reliably determine how much and "if" you need to cool your print. Let's take a look at some scenarios.
PLA Prints
PLA can almost always benefit from some cooling air flow to help solidify the part as layers are built up. PLA stays soft for quite some time and is prone to warping and distorting due simply to plastic flow. A fan - or fans - aimed at the part can prevent this. I prefer to position the fans on the build platform rather than the printing head. This gives me more direct cooling to all parts of the print and removes mass from the print head. It also allows me to use several smaller fans distributed around the part rather than one big fan blowing a lot of unused air. I actually use three 40mm fans space 120° around the part. Adjusting the fan speed gives me control over cooling.
One tip, don't use the print fan on the first few layers. You want those to stick to your build surface and cooling them as they form is a recipe for pealing trouble.
Very Small Parts
Small prints (with a foot print around 15mm x 15mm or so) in all materials can benefit from cooling as they print. These small parts usually don't have a chance to effectively cool before the next layer is applied. You can also slow down your feedrate to allow cooling.
Prints with Thin Cross Sections
Prints in all materials that have thin cross sections or thin columns can benefit from cooling as they print. These thin cross sections usually don't have a chance to effectively cool before the next layer is applied.
Prints with Solid Infills
Prints with or near 100% infill can also retain heat and stay soft for long periods of time. Fans are an effective way to cool these parts.
NOTE: Most Arduino based controllers like RAMBo have fan ports. The RAMBo port is great for the part cooling fan (or fans). That way you can control it from gcode. For instance, with PLA I put down the first 4 layers without the fan and then turn the fan on 50% for the remainder for most parts or 100% for thin/pillar types of parts.
I'm sure I missed a few considerations so feel free to comment.
Sublime Layers - my blog on Musings and Experiments in 3D Printing Technology and Art
As I said above, I use a barrel cooling fan at all times.
For prints, this really depends on geometry, print speed and other factors. I print many parts in ABS with no fan at all. This is part of the experimentation and learning to determine what works best for your situation.
Sublime Layers - my blog on Musings and Experiments in 3D Printing Technology and Art
I also believe that a cooling fan for the hotend is essential. Not an option at all in my opinion.
Care must be taken that it's "overflow" air does not cool your part unintentionally. By use of some type of "shielding" obstruction like a piece of tin or whatever.
"Now you see why evil will always triumph! Because good is dumb." - Spaceballs
What I would warn is that if aluminum foil is used as a deflector, care has to be taken to prevent shorting of the resistors or thermistor. Don't want to damage the control board.
I also found that the PEEK fan should be positioned on the opposite side that thermistor is mounted. This reduces the impact to thermistor readings.
Is there any link (Amazon prime would be great, but couldn't find any) for the 25mm fans? I had to use a 40mm because I didn't find any after a bit of searching (didn't look too hard, but did check my usual sites).
@MorbidSlowBurn good call on the fan placement, hadn't thought about that
(No trees were killed to post this message, but a large number of electrons were terribly inconvenienced.)
mhackney wrote:What is the flow rate on those? And how "thick" are they? I am using 25mm x 25mm x 10mm thick. Nice and small with lots of flow at 2.4 CFM.
Delta Electronics # AFB02505HHB. 5Vdc, 0.23A. 25 x 25 x 15mm. DC brushless ball bearing fan. 13,000RPM. 29.5dBA. 4.06 CFM. Two 50mm leads with 2-conductor female connector, 0.1" centers. UL, CSA, CE, VDE.
Im trying to add a fan to the hotend but cant get it to turn on i have plugged it into the fan port next to the hotend.
Im using marlin for rostock max rambo LCD
any help would be appreciated
thank you
[email protected] wrote:Im trying to add a fan to the hotend but cant get it to turn on i have plugged it into the fan port next to the hotend.
Im using marlin for rostock max rambo LCD
any help would be appreciated
thank you
I use polygonhell's firmware, it worked for me no problems. Did you check polarity?
(No trees were killed to post this message, but a large number of electrons were terribly inconvenienced.)
[email protected] wrote:its weird my 25x25 fans wont work but my 40 mm fan will??
is there a reason for this??
No, there is no reason the 25mm fan won't work. I don't mean to insult your intelligence but has the 25mm fan
been connected to a different 12V source and tested that it is good?
no i bought it and just opened the package to install it i bought two of them and both of them would not work
so im guessing since the 40mm worked with the same wiring i received two bad fans?
Folks, please can we create a new thread for troubleshooting? In order to make it easier for folks to find information in these sticky posts we need to stay on topic. The discussion about where to buy fans was a little tangential but ok. Figuring out one person's fan problem is best done in a dedicated thread.
Thanks,
Michael
Sublime Layers - my blog on Musings and Experiments in 3D Printing Technology and Art
We have the 25mm fans on our site, and will be posting 40mm as well. We actually started shipping with a 25mm fan in all kits around a month ago, and recommend a first print when calibrated is the fan shroud, but I don't use it lol.
FWIW, if you like the 25x25x10mm 5 volt fans, the RAMBo has a 5v regulated tap on the board, up by HEAT_0 connector, it's silkscreened 5V Aux (or similar) You can tap your 5v fans in there, plenty of power from the regulator to run it
I posted this on the mods & upgrades forum a while back but, for what it's worth, I made a fan shroud for the 40mm fan. http://www.thingiverse.com/thing:110305
I test printed both fan shrouds in ABS successfully. Elmers white all-purpose glue stick provided excellent traction. Head temp was 228; bed temp 80.
After I installed the peek fan and re-calibrated the temp control algorythm, I started trying to print files obtained from "Thingaverse". Right away it was obvious that things had changed for the worse. The extrusion now emerges from the extruder with a little curlique, and the ABS seems to have hardened significantly the minute it hits the air (fan on). I tried extruding material to clear the pipe and to release fresh ABS, but it hardens quickly and refuses to stick to the platform. I have raised platform temp to 90-95 c and it still won't stick. It winds up being pushed around by the extruder eventually winding up in a knot. I have raised the hot end temp to 235 c, and the same thing happens. I have tried various amounts of glue on the glass. My best newby observation is that the ABS is extruding at too low a temp and setting up before it sticks to the job. Here are some issues that have stumped me:
1)bed temp doesn't want to go over about 93-94 c. I don't know where to juice it up.
2)The all-purpose Elmersglue stick (not blue) is wimpy. Any better stuff around? Can it all be down to the stickum?
3)Should the peek fan run with ABS and other high temp material? Can the peek fan be disabled in software? Is it a good idea? Would it require recalibration?
4)How does one clean up the extruder if it gets clogged? How much disassembly is required? Is there a solvent, or is some boring tool required? The extrusion hole does seem to be running slower.