g.
crocky's Rostock Max V2 Build
Re: crocky's Rostock Max V2 Build
Australia. Not only is the wildlife trying it's damnedest to scrub you from the surface of the planet, the solar system wants in on the action too. 
g.
g.
Delta Power!
Defeat the Cartesian Agenda!
http://www.f15sim.com - 80-0007, The only one of its kind.
http://geneb.simpits.org - Technical and Simulator Projects
Defeat the Cartesian Agenda!
http://www.f15sim.com - 80-0007, The only one of its kind.
http://geneb.simpits.org - Technical and Simulator Projects
-
predawnsky

- Printmaster!
- Posts: 169
- Joined: Sun Oct 05, 2014 8:11 pm
Re: crocky's Rostock Max V2 Build
i think it was a total of 140 hrscrocky wrote:That t-rex looks good
Must have taken a while to print that out.
The cancers are a by product of sunburn that I got probably about 40 years ago when living in North Queensland.
Just started a 23 hour print.....
Re: crocky's Rostock Max V2 Build
Same as you, have'nt done it yet.... Have'nt put the PEI on it either, have'nt put the E3D on it either....McSlappy wrote:Hey man looking good! I've printed a dual extruder mount as well, though my machines have been running so much lately I haven't had a chance to install themFirst world problem I know
You've probably already beat me to dual extruders, so let me know how that goes!
So many jobs to do I have all the right bit too
(Geneb) Wildlife doesn't seem to be a big problem for me, pretty tame down here..
Bob
Rostock Max V2, Ball Cup Arms, New Carriages, HE280, Dampers, PSU Breathing, Simplify 3D, GeckoTek3D, Raspberry Pi3. Duet soon... Kossel Mini still under construction.
Delta's are the way!
Rostock Max V2, Ball Cup Arms, New Carriages, HE280, Dampers, PSU Breathing, Simplify 3D, GeckoTek3D, Raspberry Pi3. Duet soon... Kossel Mini still under construction.
Delta's are the way!
Re: crocky's Rostock Max V2 Build
Had to put the E3D on it, the seemecnc one started to leak around the insulator.... Been flat out making Victorian Lamps 
- Colourful Mount!
Bob
Rostock Max V2, Ball Cup Arms, New Carriages, HE280, Dampers, PSU Breathing, Simplify 3D, GeckoTek3D, Raspberry Pi3. Duet soon... Kossel Mini still under construction.
Delta's are the way!
Rostock Max V2, Ball Cup Arms, New Carriages, HE280, Dampers, PSU Breathing, Simplify 3D, GeckoTek3D, Raspberry Pi3. Duet soon... Kossel Mini still under construction.
Delta's are the way!
Re: crocky's Rostock Max V2 Build
this is the current output from the bandit!
It is a rather nice lamp with battery tea light...
- Victorian Lamp
Bob
Rostock Max V2, Ball Cup Arms, New Carriages, HE280, Dampers, PSU Breathing, Simplify 3D, GeckoTek3D, Raspberry Pi3. Duet soon... Kossel Mini still under construction.
Delta's are the way!
Rostock Max V2, Ball Cup Arms, New Carriages, HE280, Dampers, PSU Breathing, Simplify 3D, GeckoTek3D, Raspberry Pi3. Duet soon... Kossel Mini still under construction.
Delta's are the way!
Re: crocky's Rostock Max V2 Build
FSR's for Calibration, the way to go!
Buy the FSR kit from Ultibots they make the implementation of these things a breeze.
I used my own mount and piston design, you can copy mine if you like or go ahead and design your own. Wire the FSR's to the board using the provided harness wiring. I used the thin pads and I stuck them onto the centre of each FSR. Make sure that the pistons are a sliding fit in the FSR mounts but have no sideways movement. The FSR consist of three mounts so the other three holes will have to be bolted to the plate only and not to the top of the Rostock.
The wiring from the board pins marked +/-, -/+, S goes to the Rambo board Z-min endstop position +, -, S. No wires are changed, just use it as is. The important wire is the one that goes to S pin.
The following changes are made to the firmware in the configuration file and then written to the printer.
Edit: Must be something with being downunder, pic's are upside down!!!
Configuration.h
#define FEATURE_Z_PROBE true
#define Z_PROBE_PIN 10
#define Z_PROBE_PULLUP true
#define Z_PROBE_ON_HIGH false
#define Z_PROBE_HEIGHT 0
See if the probe works, send a G30 to it and see if it moves down and is triggered.
Now go and get Rollie's latest Delta Automatic Configuration Utility and give them FSR's a workout!
Buy the FSR kit from Ultibots they make the implementation of these things a breeze.
I used my own mount and piston design, you can copy mine if you like or go ahead and design your own. Wire the FSR's to the board using the provided harness wiring. I used the thin pads and I stuck them onto the centre of each FSR. Make sure that the pistons are a sliding fit in the FSR mounts but have no sideways movement. The FSR consist of three mounts so the other three holes will have to be bolted to the plate only and not to the top of the Rostock.
- "Other" three hole mounting detail
The following changes are made to the firmware in the configuration file and then written to the printer.
Edit: Must be something with being downunder, pic's are upside down!!!
- FSR Mounting - X-Tower
- FSR Control Board
Configuration.h
#define FEATURE_Z_PROBE true
#define Z_PROBE_PIN 10
#define Z_PROBE_PULLUP true
#define Z_PROBE_ON_HIGH false
#define Z_PROBE_HEIGHT 0
See if the probe works, send a G30 to it and see if it moves down and is triggered.
Now go and get Rollie's latest Delta Automatic Configuration Utility and give them FSR's a workout!
Bob
Rostock Max V2, Ball Cup Arms, New Carriages, HE280, Dampers, PSU Breathing, Simplify 3D, GeckoTek3D, Raspberry Pi3. Duet soon... Kossel Mini still under construction.
Delta's are the way!
Rostock Max V2, Ball Cup Arms, New Carriages, HE280, Dampers, PSU Breathing, Simplify 3D, GeckoTek3D, Raspberry Pi3. Duet soon... Kossel Mini still under construction.
Delta's are the way!
Re: crocky's Rostock Max V2 Build
Crocky, are you screwing down the FSR mount using a #4 flat head and the original Onyx t-nut that's installed in the base?
tnx.
g.
tnx.
g.
Delta Power!
Defeat the Cartesian Agenda!
http://www.f15sim.com - 80-0007, The only one of its kind.
http://geneb.simpits.org - Technical and Simulator Projects
Defeat the Cartesian Agenda!
http://www.f15sim.com - 80-0007, The only one of its kind.
http://geneb.simpits.org - Technical and Simulator Projects
Re: crocky's Rostock Max V2 Build
Close, I am using the tapered screws that were provided in the kit for the three FSR mounts.
I then cut about 1/8" off the remaining screws and used countersunk heads for the FSR Pistons with normal nuts. I then used some 1/8" by 1/2" screws and spring washers and nuts for the other three holes in the plate that are not connected to the Rostock now.
I then cut about 1/8" off the remaining screws and used countersunk heads for the FSR Pistons with normal nuts. I then used some 1/8" by 1/2" screws and spring washers and nuts for the other three holes in the plate that are not connected to the Rostock now.
Bob
Rostock Max V2, Ball Cup Arms, New Carriages, HE280, Dampers, PSU Breathing, Simplify 3D, GeckoTek3D, Raspberry Pi3. Duet soon... Kossel Mini still under construction.
Delta's are the way!
Rostock Max V2, Ball Cup Arms, New Carriages, HE280, Dampers, PSU Breathing, Simplify 3D, GeckoTek3D, Raspberry Pi3. Duet soon... Kossel Mini still under construction.
Delta's are the way!
Re: crocky's Rostock Max V2 Build
So you're screwing straight into the melamine base without using the existing mounting holes?
g.
g.
Delta Power!
Defeat the Cartesian Agenda!
http://www.f15sim.com - 80-0007, The only one of its kind.
http://geneb.simpits.org - Technical and Simulator Projects
Defeat the Cartesian Agenda!
http://www.f15sim.com - 80-0007, The only one of its kind.
http://geneb.simpits.org - Technical and Simulator Projects
Re: crocky's Rostock Max V2 Build
No.....
I use three of the holes to mount the FSR mounts on to, then I just bolt the other three directly to the plate with the short 1/2" screws and spring washer and nut.
I use three of the holes to mount the FSR mounts on to, then I just bolt the other three directly to the plate with the short 1/2" screws and spring washer and nut.
Bob
Rostock Max V2, Ball Cup Arms, New Carriages, HE280, Dampers, PSU Breathing, Simplify 3D, GeckoTek3D, Raspberry Pi3. Duet soon... Kossel Mini still under construction.
Delta's are the way!
Rostock Max V2, Ball Cup Arms, New Carriages, HE280, Dampers, PSU Breathing, Simplify 3D, GeckoTek3D, Raspberry Pi3. Duet soon... Kossel Mini still under construction.
Delta's are the way!
Re: crocky's Rostock Max V2 Build
So you ARE using three of the original Onyx holes for the FSR mounts. (two people separated by a common language. )
g.
g.
Delta Power!
Defeat the Cartesian Agenda!
http://www.f15sim.com - 80-0007, The only one of its kind.
http://geneb.simpits.org - Technical and Simulator Projects
Defeat the Cartesian Agenda!
http://www.f15sim.com - 80-0007, The only one of its kind.
http://geneb.simpits.org - Technical and Simulator Projects
Re: crocky's Rostock Max V2 Build
Just trying to use the Rambo controls when the switch would not be pushed in!!!
A quick look around the board here did not give an answer, so I started to have a look at the switch to see how much work there would be in replacing it and I found a little bit of filament that had got jammed in it. Took away the filament and it now works properly... Whew!
A quick look around the board here did not give an answer, so I started to have a look at the switch to see how much work there would be in replacing it and I found a little bit of filament that had got jammed in it. Took away the filament and it now works properly... Whew!
Bob
Rostock Max V2, Ball Cup Arms, New Carriages, HE280, Dampers, PSU Breathing, Simplify 3D, GeckoTek3D, Raspberry Pi3. Duet soon... Kossel Mini still under construction.
Delta's are the way!
Rostock Max V2, Ball Cup Arms, New Carriages, HE280, Dampers, PSU Breathing, Simplify 3D, GeckoTek3D, Raspberry Pi3. Duet soon... Kossel Mini still under construction.
Delta's are the way!
Re: crocky's Rostock Max V2 Build
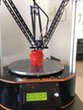
I have been a bit quiet lately on the 3D printer front while I had some radiation therapy done, hopefully that will be it for a while.
I have fitted the new trucks and ball rods to my Rostock and have got it all nicely levelled with the OpenDACT and I am just doing a six hour print job to test it all out.
I changed the display for a different colour too, not quite the colour I wanted but I have an orange one here and when I feel confident enough I'll do some desoldering and replace it.
The other bit that I changed was the mount for the E3D to the one that was manufactured by a user on here called travelphotog, he has done a terrific job!
- All the new bits
Bob
Rostock Max V2, Ball Cup Arms, New Carriages, HE280, Dampers, PSU Breathing, Simplify 3D, GeckoTek3D, Raspberry Pi3. Duet soon... Kossel Mini still under construction.
Delta's are the way!
Rostock Max V2, Ball Cup Arms, New Carriages, HE280, Dampers, PSU Breathing, Simplify 3D, GeckoTek3D, Raspberry Pi3. Duet soon... Kossel Mini still under construction.
Delta's are the way!
Re: crocky's Rostock Max V2 Build
Nice looking beastie! I still haven't been able to get the time to install the mounts I got from travelphotog. Between the twin rabbit holes of a resurgence in my R/C habit and Fallout 4, I'm pretty much doomed.
As one that spent 15 minutes a day for 48 days under the output end of an IMRT machine, I'll keep my fingers crossed for you.
g.
As one that spent 15 minutes a day for 48 days under the output end of an IMRT machine, I'll keep my fingers crossed for you.
g.
Delta Power!
Defeat the Cartesian Agenda!
http://www.f15sim.com - 80-0007, The only one of its kind.
http://geneb.simpits.org - Technical and Simulator Projects
Defeat the Cartesian Agenda!
http://www.f15sim.com - 80-0007, The only one of its kind.
http://geneb.simpits.org - Technical and Simulator Projects
Re: crocky's Rostock Max V2 Build
I'm Back....
After a bit of a break while the doctors did their thing I was finally cleared of the skin cancer today.... Took a fair while and this time last year I had just completed the radiation and the dermatologist had done a cut and removal of some stuff around my neck.
Back to printing now
I have kept up with most of the updates and I think the Max 2 is now almost completely a Max 3. Just completed the HE280 and the auto leveling modifications and fitted a magnetic build plate and did the auto leveling and it is now half way through a 22hr print job... Very nice feeling again... I have configured the Raspberry Pi 3 with OctoPrint and will get it installed and powered off the Rambo over the weekend...
Bob
Rostock Max V2, Ball Cup Arms, New Carriages, HE280, Dampers, PSU Breathing, Simplify 3D, GeckoTek3D, Raspberry Pi3. Duet soon... Kossel Mini still under construction.
Delta's are the way!
Rostock Max V2, Ball Cup Arms, New Carriages, HE280, Dampers, PSU Breathing, Simplify 3D, GeckoTek3D, Raspberry Pi3. Duet soon... Kossel Mini still under construction.
Delta's are the way!
Re: crocky's Rostock Max V2 Build
Just installed a GeckoTek build plate (with magnets to affix the HT build surface) and doing a test print of four planter/pen storage items. No glue stick or hair spray needed. GeckoTek3D.com to get more info and I am not affiliated with the company, I just like their product. The build plate is about 6 or 7 mm thick and it does take some time to heat up so if you are after speed, well... maybe 24volts!. It is fine for me at this stage though.
A couple of things that you need to be aware of, the nice red led's still work but there are no holes in the build plate so you can't see them. Same goes with the build surface, no holes. As I am a rather disabled chap with the use of only the left arm and left leg the addition of the build plate that is attached to the surface with magnets has just made my printing life so much easier. The prints just "pop" off with a slight twist after the HT surface cools and it is removed from the magnets.
- GeckoTek Plate
Bob
Rostock Max V2, Ball Cup Arms, New Carriages, HE280, Dampers, PSU Breathing, Simplify 3D, GeckoTek3D, Raspberry Pi3. Duet soon... Kossel Mini still under construction.
Delta's are the way!
Rostock Max V2, Ball Cup Arms, New Carriages, HE280, Dampers, PSU Breathing, Simplify 3D, GeckoTek3D, Raspberry Pi3. Duet soon... Kossel Mini still under construction.
Delta's are the way!
Re: crocky's Rostock Max V2 Build
I have been in contact with GeckoTek and they are willing to do some mods and give me one to test... in Australia but I don't know that he knew where I was from.
Anyway the end story is they did not have any Rostocks to do trial fittings on so make sure you send details of the number of holes that you would require and I'm sure they will do them for you. I am VERY happy with mine.......
Anyway the end story is they did not have any Rostocks to do trial fittings on so make sure you send details of the number of holes that you would require and I'm sure they will do them for you. I am VERY happy with mine.......
Bob
Rostock Max V2, Ball Cup Arms, New Carriages, HE280, Dampers, PSU Breathing, Simplify 3D, GeckoTek3D, Raspberry Pi3. Duet soon... Kossel Mini still under construction.
Delta's are the way!
Rostock Max V2, Ball Cup Arms, New Carriages, HE280, Dampers, PSU Breathing, Simplify 3D, GeckoTek3D, Raspberry Pi3. Duet soon... Kossel Mini still under construction.
Delta's are the way!
-
barry99705

- Printmaster!
- Posts: 707
- Joined: Sun Aug 11, 2013 6:10 pm
- Location: west ohio
Re: crocky's Rostock Max V2 Build
Yea, American English(also known as Simplified English), The Queen's English™ , and that weird thing they speak in Australia...geneb wrote:So you ARE using three of the original Onyx holes for the FSR mounts.
g.
Never do anything you don't want to have to explain to the paramedics.
Re: crocky's Rostock Max V2 Build
More info re the GeckoTek3D plates...
I have only screwed it on to the 3 screw holes adjacent to the towers... there are 6 screws provided if you really feel the need to have them all installed.
- GeckoTek 1
- GeckoTek 2
Bob
Rostock Max V2, Ball Cup Arms, New Carriages, HE280, Dampers, PSU Breathing, Simplify 3D, GeckoTek3D, Raspberry Pi3. Duet soon... Kossel Mini still under construction.
Delta's are the way!
Rostock Max V2, Ball Cup Arms, New Carriages, HE280, Dampers, PSU Breathing, Simplify 3D, GeckoTek3D, Raspberry Pi3. Duet soon... Kossel Mini still under construction.
Delta's are the way!
Re: crocky's Rostock Max V2 Build
Some more gecko's.....
After using it for a couple of weeks I'm very happy with it
- They're Multiplying.....
- Better piccy :)
Bob
Rostock Max V2, Ball Cup Arms, New Carriages, HE280, Dampers, PSU Breathing, Simplify 3D, GeckoTek3D, Raspberry Pi3. Duet soon... Kossel Mini still under construction.
Delta's are the way!
Rostock Max V2, Ball Cup Arms, New Carriages, HE280, Dampers, PSU Breathing, Simplify 3D, GeckoTek3D, Raspberry Pi3. Duet soon... Kossel Mini still under construction.
Delta's are the way!
Re: crocky's Rostock Max V2 Build
Configuring Rostock V2 with HE280
Upload the Arduino on the Mac
Using the Arduino program upload the eeprom_clear sketch.
Press the arrow pointing to the right to execute the sketch.
When the Arduino is done you will see a “Done uploading” status message.
Next upload repetier by selecting the file from the Arduino file and looking for the latest repetier.ino filename.
open the configuration.h after .ino is loaded and make the following changes:
Select printer type as 2
Define the MOTHERBOARD 301
Define the POWER_SUPPLY 1
PRINTER == 2
Define INVERT_Y_DIR 0
Define Z_MAX_LENGTH 350
Define MAXTEMP 290
Define Z_PROBE_SPEED 90
That should be all the changes that you need to make to be up and running... after you do the autocalibration!
Bob
Rostock Max V2, Ball Cup Arms, New Carriages, HE280, Dampers, PSU Breathing, Simplify 3D, GeckoTek3D, Raspberry Pi3. Duet soon... Kossel Mini still under construction.
Delta's are the way!
Rostock Max V2, Ball Cup Arms, New Carriages, HE280, Dampers, PSU Breathing, Simplify 3D, GeckoTek3D, Raspberry Pi3. Duet soon... Kossel Mini still under construction.
Delta's are the way!
Re: crocky's Rostock Max V2 Build
Changing Filament?
My method for changing the filament colour is to snip the existing colour off just above the extruder entry and pre-heat the hot end to approx 200 degrees and then manually feed the filament until the extruder runs out.
Using a spanner of the correct size undo the bowden fitting from the base of the extruder and snip the filament flush with the thread of the bowden attachment. Place the new colour filament spool on the holder and feed it through the extruder by pressing the lever down and continue feeding it until you have about 10mm clear of the base of the extruder.
Grab the bowden attachment and push the filament into it (this will cause some of it to come out of the hot end) and screw the bowden attachment back into the extruder and lightly tighten with a spanner.
You can then print a two coloured model or just simply keep extruding filament until the colour change takes effect. This prevents clogs and does not require me to get anywhere near my HE280, it just works.
Bob
Rostock Max V2, Ball Cup Arms, New Carriages, HE280, Dampers, PSU Breathing, Simplify 3D, GeckoTek3D, Raspberry Pi3. Duet soon... Kossel Mini still under construction.
Delta's are the way!
Rostock Max V2, Ball Cup Arms, New Carriages, HE280, Dampers, PSU Breathing, Simplify 3D, GeckoTek3D, Raspberry Pi3. Duet soon... Kossel Mini still under construction.
Delta's are the way!