Finished my Rostock MAX v2.. first prints.. gazilions of Qs

Discussions related to the Rostock MAX v2
Post Reply
prussiap
Printmaster!
Posts: 62
Joined: Fri Sep 05, 2014 5:26 pm

Finished my Rostock MAX v2.. first prints.. gazilions of Qs

Post by prussiap »

Hey Guys,
First off I want to thank JJ from seemecnc and Geneb for all the help debugging while I was building this printer kit. Also thanks to all those that walked this path before me for Version one and Orion and helped make the manual easy to follow, full of pictures and extremely thorough.

I'm going to break this post into a few sections to help you jump around since this post is much longer then originally anticipated:

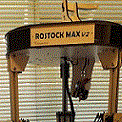
Build Me My Rostock The Journey Begins:
Our hackerspace has an Ultimaker and a PrinterbotJR both of which have been ok but pains to maintain. A friend of mine though converted one of his printers into a Delta and has raved about it ever since. After much research I decided on a Delta printer since we didn't have one of those at the lab and my friend referred me to SeeMeCNC. Now the really hard choices came down to Orion vs Rostock MAX 2 ,aka build your own huge printer :) or buy it pre-built, and I decided to go the build my own route. I now have a much better appreciation for all the parts that make this printer work and have an idea of how to fix it.

So on to the build pictures :
The build took about 20hrs. I was not in a hurry and took my time enjoying the build. https://www.dropbox.com/sc/72wfgav0x96d ... 7gmtjwOyaa" onclick="window.open(this.href);return false;

I had a few small questions while following the manual here and there but for the most part smooth sailing. My printer parts were much newer then the manual though. Thankfully most of the changes were common sense and the new manual is inbound (i'd love to help if i can).

Arghhh melted my PEEK, failed at my shroud and Improved my second hot end
Melted PEEK: https://www.dropbox.com/sc/d3i7ds722azb ... 0-lCgD-b0a" onclick="window.open(this.href);return false;
So finally got to AutoPid tuning and I got a little bit of smoke and then the PEEK melted off. Tech support was super helpful and I bought some spares and got a spare PEEK. Seemed all the connections were there, the sealant was done well and the wires were solidly connected. I dissected the piece after but to no avail. In any case Kudos to support and Geneb for walking me through how to debug and the help.

Waited a week my replacement parts came in and I improved the hot end design a bit with better cable management extended some wires and added some connectors :).
So I printed the fan shroud. https://www.dropbox.com/sc/85b6cdgpsrv1 ... pPsJRWWpva" onclick="window.open(this.href);return false; sadly even after some grinding/sanding of the plastic the fan broke. Ordered replacement fans but i don't really need the fan for ABS as far as I can tell. My friend with the delta told me that with PLA I should just use a desk fan so I'll probably go that route.

Pretty Pictures of my orange ABS Pumpkins, the shroud and my first prints.
Now the fun prints with little to no tweaking :)
https://www.dropbox.com/sc/pon5nhcosbfr ... NlnhTLqMma" onclick="window.open(this.href);return false;

That big pumpkin took 38hrs and I still have not maxed out the height the build diameter.

I also finally got OctoPi and camera installed but still have a million questions about proper settings.

Questions Mucho Questions thoughts, ideas and did you make it this far :)

1. Are there any good guides, tutorials or collections of posts on ABS/PLS/T-glase for Repetier and Slicer configurations? Anything that might help me minimize trial and error and get a better understanding of my filaments.
- I have PLA and T-GLASE but i'm afraid of switching over yet since i'm still trying to master ABS. What does the FLOW % setting on the printer actually do? Same for the Speed of print which i've safely brought to 150%. There are also many options for filament flow rates, infill speeds, layer heights etc in slicer and repetier. Anyway links to forum posts or blogs with concatenated info would be awesome. Feeling of being overwhelmed :)
- slicer settings (lots to read) http://forum.seemecnc.com/viewtopic.php?f=13&t=17" onclick="window.open(this.href);return false; or http://forum.seemecnc.com/viewtopic.php?f=13&t=5413" onclick="window.open(this.href);return false;

2. Nozzle sizes: So I think a .5mm nozzle shipped with my printer. Does decreasing nozzle size just makes for smaller layers and better detail ? What settings change based on that.

3. NOISE: That 38hr pumpkin print drove me insane as the printer is 2ft from my bed and really loud. I heard that it's possible to put these http://3d.grabercars.com/?product=vibra ... 7-astrosyn" onclick="window.open(this.href);return false; Astrosyn dampeners on the NEMA-17 motors? If it is possible how much of a noise reduction do you get and is it worth it?

4. More Noise Help. I'm also considering building some sort of sound dampening case with plexiglass windows. I think this would be ok with ABS as heat is less of an issue then cooling fast but with PLA and these other quickly cooled plastics I would probably need good ventilation in and out of the box? Does anybody have a sound proofing box and if so what material and constraints did you use?

5. ABS failures on Dalek: I actually lowered the print speed on the actual Rostock to 80% https://www.dropbox.com/sc/ewbfv1qxxma3 ... Nz60I1jLoa" onclick="window.open(this.href);return false; .Can somebody help me EXTERMINATE all the filament fuzz that's being extruded? I decided against support structure but might not be able to get away with it. Or I should have printed faster to let it cool. Not sure but I'd love to re-print for my friends kid

6. OctoPi: How do you translate your Repetier ABS/PLA settings to more Cura like settings for the octoPI. https://www.dropbox.com/s/ds39wwnwayrr5 ... 6.png?dl=0" onclick="window.open(this.href);return false; https://www.dropbox.com/s/86pn84lzrlhw2 ... 9.png?dl=0" onclick="window.open(this.href);return false;

7. All Metal extruders. I saw the E3d extruders and the rostock http://micron3dp.myshopify.com/products ... mm-hot-end" onclick="window.open(this.href);return false; all metal hot ends discussed on the forums here. I was wondering if anyone who has these metal hot-ends wanted to comment on advantages/disadvantages they've seen or thought. I would imagine less thermistor shorting and probably better temperature distribution. I'm far away from deciding on this purchase but wanted to hear some thoughts. I'll keep reading on the forums.

8. Dual Extruders: I'm also pretty far from this decision. I'd like to learn my way around the hot ends and the filament

Well I'm sure i'll get many of these answers by digging through the RepRap site and the forums but any help appreciated. I also wanted to share my experiences while building the printer and hope it helps others in the future.

Thanks
dtgriscom
Printmaster!
Posts: 210
Joined: Sun Feb 09, 2014 10:15 pm
Location: Wakefield, MA
Contact:

Re: Finished my Rostock MAX v2.. first prints.. gazilions of

Post by dtgriscom »

prussiap wrote:What does the FLOW % setting on the printer actually do?
That changes the amount of filament extruded, relative to the calculated "correct" value. Based on the filament diameter, the extruder steps/distance, and the desired extrusion width/height, the software decides how much filament to extrude over time. Changing the flow percentage adjusts this final number. If you find yourself over- or under-extruding, this might be a quick way to compensate.
prussiap wrote:Same for the Speed of print which i've safely brought to 150%.
That speeds up the head motion proportionally (and the extrusion rate as well). I've run at up to 400% at times (yeeeeee haw!) but the success (or lack thereof) is dependent on lots of variables.
prussiap wrote: 2. Nozzle sizes: So I think a .5mm nozzle shipped with my printer. Does decreasing nozzle size just makes for smaller layers and better detail ? What settings change based on that.
I'd leave the nozzle alone for now. Lots to explore first.
prussiap wrote:
3. NOISE: That 38hr pumpkin print drove me insane as the printer is 2ft from my bed and really loud. I heard that it's possible to put these http://3d.grabercars.com/?product=vibra ... 7-astrosyn" onclick="window.open(this.href);return false; Astrosyn dampeners on the NEMA-17 motors? If it is possible how much of a noise reduction do you get and is it worth it?
I installed Astrosyn dampers when I built my Rostock MAX. The results are fairly quiet, and I've heard that not having the dampers makes things a LOT louder.
Earthbound
Printmaster!
Posts: 458
Joined: Sun Sep 07, 2014 2:39 am

Re: Finished my Rostock MAX v2.. first prints.. gazilions of

Post by Earthbound »

+1 for the Astrosyn motor mounts.

Do not consider the PEEK fan to be optional. You don't need the LAYER fan for printing ABS, but it won't hurt. Using a desk fan will blow air everywhere, not just where you need it. It may cool the hot end and make temperature control more erratic.

The all-metal hot ends are needed for high temperature materials. The stock hot end is excellent for PLA and good for ABS, too. It is better than the aftermarket all-metal hot ends for printing PLA.

I nearly eliminated stringing by switching to MatterControl and using MatterSlice. Slic3r seems to be known for stringing.
"Trust no quote from the Internet." - Abraham Lincoln
prussiap
Printmaster!
Posts: 62
Joined: Fri Sep 05, 2014 5:26 pm

Re: Finished my Rostock MAX v2.. first prints.. gazilions of

Post by prussiap »

Thanks for the replies guys.

Sounds like I should order the Astrosyn then. Also sounds like that might be a big project to remove the the steppers (belts top etc) re-calibrate x,y,z middle etc..

thoughts on the easiest way to go around that?

I did download MatterControl so maybe i'll try that. Not sure how to get my setting from slicer to translate there.

I also need a better beginners guide to understand slicing techniques, what infills volume to use, how to get better resolution prints etc.. I've sort of not been tweaking too much yet because i'm afraid to :)

So has anybody explored putting sound proofed box around their machine? The problem i see is making sure there is ventilation for things like PLA etc..

I'm really wishing i had done those Astrosyns when I was building it now.
pmazz850
Prints-a-lot
Posts: 23
Joined: Mon Sep 15, 2014 8:01 pm

Re: Finished my Rostock MAX v2.. first prints.. gazilions of

Post by pmazz850 »

The motor dampers are not that hard to mount. I added mine afterwards. I just removed lower acrylic covers,loosened the belts and unscrewed the motors. Of course you do have to re calibrate but it does make a nice improvment on sound.
prussiap
Printmaster!
Posts: 62
Joined: Fri Sep 05, 2014 5:26 pm

Re: Finished my Rostock MAX v2.. first prints.. gazilions of

Post by prussiap »

Hey,
Ok so waiting for my Astrosyns so thought I'd post my proposed approach and see if there are any flaws or suggestions from folks.

1. Unhook the hot end to belt section connectors so that the hot end dangles since no belts in next step https://www.dropbox.com/s/klsdv6as463l0 ... 0.jpg?dl=0" onclick="window.open(this.href);return false;
2. Unscrew the screws and remove belts. https://www.dropbox.com/s/qyifw382lp3bj ... 4.jpg?dl=0" onclick="window.open(this.href);return false;
3. Unscrew servo motor screws (I think) the four.
4. Attach Astrosyns to servo
5. Potentially adjust the gear/bearing on stepper outward to adjust for extra space ?
6.. reverse process ?
7. Calibrate x/y/z probably re-tune pid (not necessary).

Does this sound about right?

Also I have a few more questions unrelated.
1. Hot end seems caked https://www.dropbox.com/s/91xbr6jwddrbc ... 4.jpg?dl=0" onclick="window.open(this.href);return false; . I think it's because a few of my prints not sticking to the base and thus blobbing at the nozzle. I didn't always catch those early?. What's the best way to clean the nozzle off ? Heat it up and scrape?
2. I have a few prints like this vase http://www.thingiverse.com/thing:153994" onclick="window.open(this.href);return false; for example that print the base just fine but then pop off. Not sure how to improve with support or brim or skirt? I'm using heated bed and hairspray now. thoughts?

Ok any help is appreciated before I spend the time retrofitting.
User avatar
redoverred
Printmaster!
Posts: 159
Joined: Tue Sep 30, 2014 2:28 pm
Contact:

Re: Finished my Rostock MAX v2.. first prints.. gazilions of

Post by redoverred »

As for adhesion, I prefer purple elmer's glue sticks for ABS and only use hairspray for PLA. I heat the bed to 50 C and do the gluestick back and forth evenly, let it dry, then do another layer at 90 degrees to the first layer direction. Once I've printed something, I put a tiny bit more glue where the previous part was. I also clean the glass every 2-4 prints with water and a sponge in the sink and get all the old glue off and then reapply it. Sometimes I also use acetone (pure acetone) and wipe it down really good after I've gotten the old glue off. As for the hairspray, I wash it only when the PLA stops sticking to it and don't apply "new" hairspray until it's been cleaned. MAKE SURE not to spray the hairspray on while the plate is on the machine! Take it off, go into another room, and spray it otherwise you might gum up your moving parts with hairspray and dust.

As for the dirty nozzle, it's not too important to clean it unless it is super-caked and affecting the print (or you want to adjust the z0.0 height), but I use a sponge with the greenie-weenie scrub pad on one side. Then, when the hotend is hot and I notice new plastic on it (when it is heating up or a print is done), I can use the regular sponge side (DRY) to wipe it off and if there is old caked-on crap all over I can use the green scrubby side to get that off. I am not sure if the green scrubby side would ruin the nozzle, so I ONLY use it on the sides of the nozzle and hot end and avoid the actual nozzle orifice. The sponge shouldn't ruin anything, so I just draw it slowly across the whole thing while pressing a bit and most "new" plastic that has gathered will simply stick to the sponge where I can pick it off later.
prussiap
Printmaster!
Posts: 62
Joined: Fri Sep 05, 2014 5:26 pm

Re: Finished my Rostock MAX v2.. first prints.. gazilions of

Post by prussiap »

Foiled by screws. Well I finally got the screw drivers that would fit in that tiny space and the Astroyn's. but there are two things i notice.

1. Only two screws are actually screwed into stepper motor from Astrosyn. Other two screws seem to come through the structure and the dampener and maybe into the motor?
- dampeners on the way I think they should be (not too many ways you can go with 4 screws..) https://www.dropbox.com/s/jjpfljdeh3ohk ... 8.jpg?dl=0" onclick="window.open(this.href);return false;

2. I missing those other two long screws. I'm assuming M3 16mm should work but i'm going to buy a few sizes.
- As you can see not quite making it far enough. https://www.dropbox.com/s/n0mb8eq1rwswd ... 0.jpg?dl=0" onclick="window.open(this.href);return false;

Is it better to go through the frame and all the way to the motor and screw in or use a nut on the dampener to tighten ?

Suggestions welcome :) Mcmaster-carr here i come.
geneb
ULTIMATE 3D JEDI
Posts: 5367
Joined: Mon Oct 15, 2012 12:47 pm
Location: Graham, WA
Contact:

Re: Finished my Rostock MAX v2.. first prints.. gazilions of

Post by geneb »

The screws supplied with the dampers plus the screws you removed from the stepper motors are all that you should need.

It's hard to spot, but the holes on one of the damper plates are threaded.

g.
Delta Power!
Defeat the Cartesian Agenda!
http://www.f15sim.com - 80-0007, The only one of its kind.
http://geneb.simpits.org - Technical and Simulator Projects
prussiap
Printmaster!
Posts: 62
Joined: Fri Sep 05, 2014 5:26 pm

Re: Finished my Rostock MAX v2.. first prints.. gazilions of

Post by prussiap »

As usual Geneb. Made my day. except for this one stupid screw i can't get to on the back stepper motor.. sigh. I can't get that one unscrewed no matter what. just can't get clearance with any screw driver to get to it..
Fiddler2070
Printmaster!
Posts: 58
Joined: Wed May 28, 2014 9:16 pm

Re: Finished my Rostock MAX v2.. first prints.. gazilions of

Post by Fiddler2070 »

Definitely get the dampers. They work so well that the peek fan is now the loudest thing on the printer. It screams like a jet engine which I'm guessing means it's about to fail. I am trying to figure out if I will switch to E3D hot end or replace the fan with something bigger and a different shroud.
Mac The Knife
ULTIMATE 3D JEDI
Posts: 1409
Joined: Sun May 11, 2014 6:18 pm

Re: Finished my Rostock MAX v2.. first prints.. gazilions of

Post by Mac The Knife »

Fiddler2070 wrote:Definitely get the dampers. They work so well that the peek fan is now the loudest thing on the printer. It screams like a jet engine which I'm guessing means it's about to fail. I am trying to figure out if I will switch to E3D hot end or replace the fan with something bigger and a different shroud.
I just replaced mine with a ball bearing version. If you haven't replaced your Rambo fan yet, you might as well have have one for it on standby as well.
R-Max V2
Eris
Folger Tech FT-5 R2
prussiap
Printmaster!
Posts: 62
Joined: Fri Sep 05, 2014 5:26 pm

Re: Finished my Rostock MAX v2.. first prints.. gazilions of

Post by prussiap »

I had a will so I found a way... Anyway SOOOOOOOOOOOOO quiet. Wow that is an amazing difference in sound.

The calibration doesn't seem to be off by much either.

Also anybody know the setting in the firmware to get the Rostock not to beep like crazy when it starts and ends ? A muted tone would be nice or just mute. Give my dogs a heart attack every time it starts or ends :)
prussiap
Printmaster!
Posts: 62
Joined: Fri Sep 05, 2014 5:26 pm

Re: Finished my Rostock MAX v2.. first prints.. gazilions of

Post by prussiap »

Mac the Knife what do you mean?

The Rambo fan is pretty loud actually that would be a next place to try to improve. I would get the fan for Peek if I can ever print a shroud for it that works.
prussiap
Printmaster!
Posts: 62
Joined: Fri Sep 05, 2014 5:26 pm

Re: Finished my Rostock MAX v2.. first prints.. gazilions of

Post by prussiap »

still happy with the sound.

So I started printing T-glase. Worked the first try. I still need the PEEK fan and the shroud fan for layers.

I'm seeing this malformed printing on top and dropping sides.
top: https://www.dropbox.com/s/5b5kd127qsbus ... 7.jpg?dl=0" onclick="window.open(this.href);return false;
drooping: https://www.dropbox.com/s/r3x5ir39s4047 ... 0.jpg?dl=0" onclick="window.open(this.href);return false;

Also curious if I can shrink the layers (never tested these settings yet) to make it look clearer ?
layers: https://www.dropbox.com/s/5s0keiyoi4wzd ... 6.jpg?dl=0" onclick="window.open(this.href);return false;

using the default t-glaze settings so far from SeeMeCNC... I'm also considering switching to mattercontrol from repetier or Octoprint but will see what advantages there are.
Mac The Knife
ULTIMATE 3D JEDI
Posts: 1409
Joined: Sun May 11, 2014 6:18 pm

Re: Finished my Rostock MAX v2.. first prints.. gazilions of

Post by Mac The Knife »

The fans that come with the printer using bushings instead of bearings to support the motor shaft. If, as you say, the Rambo fan is also noisy, you may as well save shipping and order one of those along with a new peek fan. This is what I used to replace the peek fan http://www.ebay.com/itm/170764022133?_t ... EBIDX%3AIT,
R-Max V2
Eris
Folger Tech FT-5 R2
Post Reply

Return to “Rostock MAX v2”