Hi - I'm a 3D printer noob & this thread will document my journey into the art & science of building my first printer.
I visited MAX's parents yesterday to pick up my baby - thanks to John and Steve for taking the time to show me around the shop and chat for a while. There's no question in my mind - these guys know their stuff and are making a great product at a great price. They're committed to the 3D printing community and with their expert background in the CNC and injection molding space they bring great bona fides. I can't wait to see how they continue to increase their offerings.
Also, John didn't laugh when I dropped my new baby on the way to the car! The fall chipped the edge of the melamine sheets but didn't effect any of the pieces - my parts were loose in an open top box (my choice) and not packed with peanuts in a sealed box - I'm confident that unless UPS drives a truck over the box then the other kits should arrive safe and sound.
I started assembly yesterday evening and have started keeping track of build notes. I'll post them here later today and I'll also send them to John & Steve and probably create a sub-page at the wiki for "user notes on building".
Exciting times!
jdh2550's Rostock MAX
Re: jdh2550's Rostock MAX
OK - end of day 1 and I've reached "base camp"... but not without a few adventures along the way...
1) The biggest slow down was the idlers and stepper motor mounting. I had a heck of a time understanding that particular PDF and I had trouble finding the parts (they were all there - it was a question of which part is the "bushing washer 3mm" - it doesn't actually look the same in person as it does on the diagram). I couldn't find any photos or video that showed a good close up of the part.
2) It would be nice if the baggies were all labeled with contents - but I think I've got everything right so far (well, at least in the fastener dept). The one exception is I haven't figure out how to attach the PSU to the retainer.
3) Some of the holes that need the t-nuts are mighty close - I had to leave one off because it's neighbor was partly covering the hole. We'll see if that causes problems later on... EDIT: Doh! You only have to put 8 t-nuts in the bottom of the table - the ones for the insulator and bed. I filled in every hole (that wasn't countersunk on the other side indicating a different fastener).
4) Getting the table top on was a b....tch. My approach was to loosely attach the seven cover brackets to the table - with everything else already attached to the base. Then place table on base and line everything up and away we go... That was the plan. However, it took a lot of trying to get everything lined up at the same time. I started using more force to try and get things in place and I put a small hairline crack in the melamine.
5) Did you notice the snag with step 4? Yup I forgot the freakin' doors. But so be it - it was enough of a PITA getting the table on that I ain't taking it off unless I absolutely have to. I'll figure something out - one of them has the RAMBo mounted on it so I'll want that in there. Maybe I'll cut off the tabs and put a screw in to act as the pivot instead.
Here's pictures from today's adventure:
- Base with first assemblies attached
- Base with more stuff
- Base with stepper motors and idlers
- Ta da - base complete (minus doors - oops!
Last edited by jdh2550 on Mon Nov 19, 2012 8:49 am, edited 1 time in total.
Re: jdh2550's Rostock MAX
I just want to say thanks for posting this. I'm also quite new to 3d printing. I look forward to following your progress. Hopefully, I can learn from your experiences building it.
-Joshua.
-Joshua.
Re: jdh2550's Rostock MAX
Hello jdh,
thank you also for this topic. I think it will be very useful for everybody!
Can you upload the pictures with a higher resolution? Maybe we can better see how the "bushing washer 3mm" looks like
Thank you!
Kind regards,
MK
thank you also for this topic. I think it will be very useful for everybody!
Can you upload the pictures with a higher resolution? Maybe we can better see how the "bushing washer 3mm" looks like
Thank you!
Kind regards,
MK

Re: jdh2550's Rostock MAX
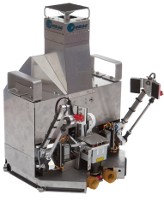
- SeeMeCNC Rostock MAX Hardware1
~PartDaddy
SeeMeCNC Owner & Founder
Blackpoint Engineering is SeeMeCNC
Since 1996
SeeMeCNC Owner & Founder
Blackpoint Engineering is SeeMeCNC
Since 1996
Re: jdh2550's Rostock MAX
~PartDaddy
SeeMeCNC Owner & Founder
Blackpoint Engineering is SeeMeCNC
Since 1996
SeeMeCNC Owner & Founder
Blackpoint Engineering is SeeMeCNC
Since 1996
Re: jdh2550's Rostock MAX
I added these photos to make hardware identification easier. Yes, most hardware are English units. However, I designed the R_MAX in Metric units; making an effort for all parts to accept both hardware sizes.
You can also download a larger photo and other things from our server:
http://seemecnc.org/download/RostockMAX/Assembly/
The first place for reference is http://reprap.org/wiki/Rostock_MAX
Thank you,
Steve
You can also download a larger photo and other things from our server:
http://seemecnc.org/download/RostockMAX/Assembly/
The first place for reference is http://reprap.org/wiki/Rostock_MAX
Thank you,
Steve
~PartDaddy
SeeMeCNC Owner & Founder
Blackpoint Engineering is SeeMeCNC
Since 1996
SeeMeCNC Owner & Founder
Blackpoint Engineering is SeeMeCNC
Since 1996
Re: jdh2550's Rostock MAX
Thanks for the extra pics Steve. I've been working from the instructions at the rep-rap wiki but didn't want to post edits on that page without running them by you and John.
--
I didn't spend as much time on assembly today - got step 2 (top assemblies) and half of step 3 (cheapskates) completed. I found that I made a mistake with putting all the t-nuts into the bottom of the table. Looking at the later instructions I saw that I needed 12 t-nuts for the cheapskates - and then taking a closer look at the rest of the instructions it seems like I only need 8 in the table for the bed insulator and the bed. Oh well - at least I could retrieve the t-nuts without any disassembly (apart from stabbing myself in the finger whilst removing one!
  )
)
BTW, the base appears to be the biggest assembly task the rest seem to be less involved. Although I'm having a slight issue figuring out the cheapskate assembly - figuring out the location of the t-nuts and what screws into 'em. I'm sure I'll figure it out tomorrow. I hope to be printing by next Sunday...
A couple pics from today's fun (MK - with Steve's pics I don't think I need to post higher res right now?)
--
I didn't spend as much time on assembly today - got step 2 (top assemblies) and half of step 3 (cheapskates) completed. I found that I made a mistake with putting all the t-nuts into the bottom of the table.
BTW, the base appears to be the biggest assembly task the rest seem to be less involved. Although I'm having a slight issue figuring out the cheapskate assembly - figuring out the location of the t-nuts and what screws into 'em. I'm sure I'll figure it out tomorrow. I hope to be printing by next Sunday...
A couple pics from today's fun (MK - with Steve's pics I don't think I need to post higher res right now?)
- top support hardware showing the "bushing washer 3mm"
- Top support assembled
Re: jdh2550's Rostock MAX
Not essentially - Steves pictures are great
Re: jdh2550's Rostock MAX
@jdh2550
The Idler Bearings in the Top Support need to be moved down to the slots. It might work where you have them, but the slots allow for easier adjustment of belt tension. (Easier than sliding the belts under the belt clamps.)
And remember, there's higher res photo's on our server too:
http://seemecnc.org/download/RostockMAX/Assembly/
~PartDaddy
SeeMeCNC Owner & Founder
Blackpoint Engineering is SeeMeCNC
Since 1996
SeeMeCNC Owner & Founder
Blackpoint Engineering is SeeMeCNC
Since 1996
Re: jdh2550's Rostock MAX
Thanks! I'll fix that tonight.PartDaddy wrote:@jdh2550
The Idler Bearings in the Top Support need to be moved down to the slots. It might work where you have them, but the slots allow for easier adjustment of belt tension. (Easier than sliding the belts under the belt clamps.)
All I see at that location are the PDF's which are on the wiki and the photos that you posted above. Are there any other hi-res photos of specific components? Could be a useful reference for noobs like me...And remember, there's higher res photo's on our server too:
http://seemecnc.org/download/RostockMAX/Assembly/
---
Build progress:
- Step 1: Base: 95% complete - need to add the doors
- Step 2: Top Support: 95% complete - I need to change the idler bearings to the slots (see partdaddy post above)
- Step 3: Cheapskates: 50% complete - I need to fettle the u-joints so that they fit on the axles (one end of each joint appears to have a small burr preventing the axle from being inserted).
- Step 4: Hot End Platform: not started yet
- Step 5: Spool and Extruder holder: 95% complete - I need to get a few extra screws (I'm working with John to figure out if it was a miscount on the BOM or in the package). This was a simple assembly to put together. One small note is that I think the 2 screw holes for the bottom extruder support should be countersunk but weren't marked that way. i.e. the bottom two holes in each 68387 Extruder Bracket needs to have the additional outer-circle added - no big deal!
- Step 6: Final assembly: not starte yet
- Electronics: not started yet
- Software: not started yet
- First print: real soon now!
Re: jdh2550's Rostock MAX
The main place to get info is on the reprap.org page for Rostock_MAX. Our server is a nice place to put larger files and higher res photo's.
The PDF's are perfect reference. The fastener identification pictures are probably second important. If anyone gets stuck, post, email, facebook, etc. John or I will be watching and ready to help. If there's customer service issue, just drop us an email to [email protected] and John or I can help right away.
The PDF's are perfect reference. The fastener identification pictures are probably second important. If anyone gets stuck, post, email, facebook, etc. John or I will be watching and ready to help. If there's customer service issue, just drop us an email to [email protected] and John or I can help right away.
~PartDaddy
SeeMeCNC Owner & Founder
Blackpoint Engineering is SeeMeCNC
Since 1996
SeeMeCNC Owner & Founder
Blackpoint Engineering is SeeMeCNC
Since 1996
Re: jdh2550's Rostock MAX
I stalled over the thanksgiving holiday - guests in town. I hope to pick up the pace this week...
Re: jdh2550's Rostock MAX
I started some "real-time" (real long) videos on our Ustream channel:
http://www.ustream.tv/channel/seemecnc
Warning: you might fall asleep listening to these videos, so put on some rock and roll before you start building.
http://www.ustream.tv/channel/seemecnc
Warning: you might fall asleep listening to these videos, so put on some rock and roll before you start building.
~PartDaddy
SeeMeCNC Owner & Founder
Blackpoint Engineering is SeeMeCNC
Since 1996
SeeMeCNC Owner & Founder
Blackpoint Engineering is SeeMeCNC
Since 1996
Re: jdh2550's Rostock MAX
I just saw the post on Indiegogo about the eDrawing viewer - this is the answer to my prayers! It really helps to be able to see the assembled pieces in detail...
Re: jdh2550's Rostock MAX
No problem. Sorry we didn't post it sooner. It's a really awesome way to share the machines details. Do you know how to right click and "hide" components? If you have less-than-awesome graphics, hiding all the parts except what you are wanting to look at /measure makes a huge difference in graphics speeds
Re: jdh2550's Rostock MAX
Where is this file eDrawing viewer? I can't find it.jdh2550 wrote:I just saw the post on Indiegogo about the eDrawing viewer - this is the answer to my prayers! It really helps to be able to see the assembled pieces in detail...
Thanks
Jerry
Re: jdh2550's Rostock MAX
I downloaded from here: http://www.edrawingsviewer.com/Racer wrote:Where is this file eDrawing viewer? I can't find it.jdh2550 wrote:I just saw the post on Indiegogo about the eDrawing viewer - this is the answer to my prayers! It really helps to be able to see the assembled pieces in detail...
Thanks
Jerry
Re: jdh2550's Rostock MAX
Hi,
have you connected the motor, powersupply, heated base, extruder to the rambo board?. If so I would love to see the instructions or any tips.
I have just finished the mechanical assembly and have to start the electronics assembly.
Thanks
ashish
have you connected the motor, powersupply, heated base, extruder to the rambo board?. If so I would love to see the instructions or any tips.
I have just finished the mechanical assembly and have to start the electronics assembly.
Thanks
ashish
Re: jdh2550's Rostock MAX
Thanks for taking the time to document.
I would also be interested in seeing pictures of how you did the electronics, wiring, endstops, etc when you get to that point. I am just about there myself.
Glenn
I would also be interested in seeing pictures of how you did the electronics, wiring, endstops, etc when you get to that point. I am just about there myself.
Glenn
Re: jdh2550's Rostock MAX
Mechanical assembly is complete (including the Bowden Extruder - thanks to the eDrawing for that one)**. Minus the doors and the heated bed.
I haven't started the wiring/electronics yet. Steve and John - are there any how-to-guides or videos for this part?
Also, my u-joints are binding still. They're not binding on the axels - they're binding in the plastic ("68304 platform 2" and "68332 u mount base"). Should I take an X-Acto knife to those parts and shave off a little plastic to make things move freely?
** although I expect the video is far better still! I should of watched those videos first!
Last edited by jdh2550 on Mon Dec 03, 2012 12:16 pm, edited 2 times in total.
Re: jdh2550's Rostock MAX
OK - you can ignore the following question (I just watched the video about belt routing) ...
One other question -
The original cheapskate has four bearings - the new one has an extra fifth bearing. This extra one "sticks out the back" - how do I route the timing belt? Should it ride over this bearing? If so, does it need some form of guide to keep it there? Conversely, if the belt routes to the left or right of this bearing isn't that going to cause unwanted friction?
The belt goes up the inside of the channel and passes underneath the back of the cheapskate and underneath that fifth bearing because the bearing doesn't ride on the bottom of the slot... (for some reason I had it in my head that the fifth bearing was "filling" this channel and would obstruct the belt)
Getting closer now!
-
WookieeGunner
- Plasticator
- Posts: 6
- Joined: Mon Dec 03, 2012 10:59 am
Re: jdh2550's Rostock MAX
Question, did you have problems getting the nuts to stay in their slots while you screwed them in? Normally I would tape them but I'm not sure I'll be able to get the tape off post-assembly.
Re: jdh2550's Rostock MAX
I actually had the opposite problem. The nuts wouldn't always fit in the slots & I had to scrape out a small amount of material.
I did have one slot that got "rounded" and wouldn't prevent the nut from rotating.
I did have one slot that got "rounded" and wouldn't prevent the nut from rotating.
-
Polygonhell
- ULTIMATE 3D JEDI
- Posts: 2430
- Joined: Mon Mar 26, 2012 1:44 pm
- Location: Redmond WA
Re: jdh2550's Rostock MAX
Following the build with some interest, I was billed for shipping last week, looking forwards to getting mine.
Printer blog http://3dprinterhell.blogspot.com/