Where did you get those thumbscrews?
g.
Mhackney's Rostock Max
Re: Mhackney's Rostock Max
Delta Power!
Defeat the Cartesian Agenda!
http://www.f15sim.com - 80-0007, The only one of its kind.
http://geneb.simpits.org - Technical and Simulator Projects
Defeat the Cartesian Agenda!
http://www.f15sim.com - 80-0007, The only one of its kind.
http://geneb.simpits.org - Technical and Simulator Projects

Re: Mhackney's Rostock Max
McMaster if I saw correctly. Think they talked about them in the TrickTrucks thread.
Re: Mhackney's Rostock Max
or amazon
Stainless Steel Thumb Screw, Plain Finish, Knurled Head, Flat Point, 1" Length, Fully Threaded, #6-32 UNC Threads (Pack of 5)
Stainless Steel Thumb Screw, Plain Finish, Knurled Head, Flat Point, 1" Length, Fully Threaded, #6-32 UNC Threads (Pack of 5)

Re: Mhackney's Rostock Max
My SS came from Amazon/Smallparts. Part #B001OO2C9S - pack of 5. They are perfect.
Sublime Layers - my blog on Musings and Experiments in 3D Printing Technology and Art
Start Here:
A Strategy for Successful (and Great) Prints
Strategies for Resolving Print Artifacts
The Eclectic Angler
Repetier 9.2???
I have installed the FSRs on my Rostock Max and now looking for the Repeater firmware that supports delta calibration. Thought I'd do this in 2 steps - FSRs first, then swap to Smoothie.
Is the only way to get .92 through the auto configuration crap? What a PIA. I hate that and it constantly seems to change.
Is the only way to get .92 through the auto configuration crap? What a PIA. I hate that and it constantly seems to change.
Sublime Layers - my blog on Musings and Experiments in 3D Printing Technology and Art
Start Here:
A Strategy for Successful (and Great) Prints
Strategies for Resolving Print Artifacts
The Eclectic Angler
Re: Mhackney's Rostock Max
There is a version from the github that you can do without the online tool. Not completely sure if its kept up to date but I think it is.
Re: Mhackney's Rostock Max
I looked at the git version and it seems to be .91 and hasn't been updated in a long time. I assumed that this meant .92 comes from a different place.
Sublime Layers - my blog on Musings and Experiments in 3D Printing Technology and Art
Start Here:
A Strategy for Successful (and Great) Prints
Strategies for Resolving Print Artifacts
The Eclectic Angler
FSR mounts and installation
Here are the new FSR mounts I designed that work with most any printer. This one is designed for the short 1/2"D FSRs that Ultibots sells in their convenient kit. They have a 2 pin connector pre-attached and come with wiring and the FSR Controller board. This board makes installation easy and provides great LED feedback.
[img]http://mhackney.zenfolio.com/img/s10/v1 ... 5344-3.jpg[/img]
Here is a closeup of the mount in place on the Rostock. I set them all up, installed the build plate (photos next), and then centered the plate. Once centered and I verified the plate floated freely, I spot glued each mount in place with superglue. Once cured, I'll drill holes and screw them down with wood screws. The slots allow for a lot of adjustment and can also be used to mount to the rails on a Kossel, TAZ or other printer.
[img]http://mhackney.zenfolio.com/img/s12/v1 ... 3853-3.jpg[/img]
[img]http://mhackney.zenfolio.com/img/s12/v1 ... 8216-3.jpg[/img]
Closeup of one of the 3 plungers affixed to the build plate. I used brass inserts to screw to the surface. My build surface consists of (top down) an 1/8" aluminum eat dissipator, the Onyx, the snowflake spacer. I clip glass/PEI to this. The plate has 6 holes, three are attached to these plungers and the other three have a screw and nut to fasten them.
[img]http://mhackney.zenfolio.com/img/s12/v1 ... 9511-3.jpg[/img]
Installed:
[img]http://mhackney.zenfolio.com/img/s7/v15 ... 1255-3.jpg[/img]
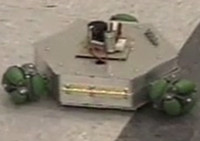
Tested - you can see 2 FSRs have triggered by by finger press (the red LEDs):
[img]http://mhackney.zenfolio.com/img/s6/v13 ... 7315-3.jpg[/img]
[img]http://mhackney.zenfolio.com/img/s10/v1 ... 5344-3.jpg[/img]
Here is a closeup of the mount in place on the Rostock. I set them all up, installed the build plate (photos next), and then centered the plate. Once centered and I verified the plate floated freely, I spot glued each mount in place with superglue. Once cured, I'll drill holes and screw them down with wood screws. The slots allow for a lot of adjustment and can also be used to mount to the rails on a Kossel, TAZ or other printer.
[img]http://mhackney.zenfolio.com/img/s12/v1 ... 3853-3.jpg[/img]
[img]http://mhackney.zenfolio.com/img/s12/v1 ... 8216-3.jpg[/img]
Closeup of one of the 3 plungers affixed to the build plate. I used brass inserts to screw to the surface. My build surface consists of (top down) an 1/8" aluminum eat dissipator, the Onyx, the snowflake spacer. I clip glass/PEI to this. The plate has 6 holes, three are attached to these plungers and the other three have a screw and nut to fasten them.
[img]http://mhackney.zenfolio.com/img/s12/v1 ... 9511-3.jpg[/img]
Installed:
[img]http://mhackney.zenfolio.com/img/s7/v15 ... 1255-3.jpg[/img]
Tested - you can see 2 FSRs have triggered by by finger press (the red LEDs):
[img]http://mhackney.zenfolio.com/img/s6/v13 ... 7315-3.jpg[/img]
Sublime Layers - my blog on Musings and Experiments in 3D Printing Technology and Art
Start Here:
A Strategy for Successful (and Great) Prints
Strategies for Resolving Print Artifacts
The Eclectic Angler
Re: Mhackney's Rostock Max
You should use twisted pairs for the FSR wires. It will cut down on noise A LOT. The wires will be picking up all sorts of crap especially if they are widely separated.
Maybe the noise doesn't matter enough, but I am certain the thresholds could be set lower if twisted pairs are used. You can just twist the existing wires, no need for anything fancy. I chuck up one end of the wires into the drill and spin them (slowly!). Also chuck the wires past the connector, it is easy to pull them out of the connector otherwise.
Maybe the noise doesn't matter enough, but I am certain the thresholds could be set lower if twisted pairs are used. You can just twist the existing wires, no need for anything fancy. I chuck up one end of the wires into the drill and spin them (slowly!). Also chuck the wires past the connector, it is easy to pull them out of the connector otherwise.
Re: Mhackney's Rostock Max
Good point, I twisted them on my Kossel install. Its a simple matter to twist these, I'll do that before I button up the install.
Cheers,
Michael
Cheers,
Michael
Sublime Layers - my blog on Musings and Experiments in 3D Printing Technology and Art
Start Here:
A Strategy for Successful (and Great) Prints
Strategies for Resolving Print Artifacts
The Eclectic Angler
Repetier 0.92.3 question...
Ok, so I wanted to try the delta calibration stuff in Repetier. But, Repetier .92 requires the configuration tool in order to get the source. I've mucked around with the config tool in the past so I gave it a go. I now have a working configuration but I had to manually edit the endstop switch configuration in the generated Configuration.h file. I can't find anywhere where these settings can be entered on the online config tool:
has anyone been able to use the auto generated config tool output as-is without manual editing?
Code: Select all
#define min_software_endstop_x true
#define min_software_endstop_y true
#define min_software_endstop_z true
#define max_software_endstop_x false
#define max_software_endstop_y false
#define max_software_endstop_z false
Code: Select all
//set to true to invert the logic of the endstops
#define ENDSTOP_X_MIN_INVERTING true
#define ENDSTOP_Y_MIN_INVERTING true
#define ENDSTOP_Z_MIN_INVERTING true
#define ENDSTOP_X_MAX_INVERTING false
#define ENDSTOP_Y_MAX_INVERTING false
#define ENDSTOP_Z_MAX_INVERTING false
Code: Select all
#define INVERT_X_DIR true
#define INVERT_Y_DIR true
#define INVERT_Z_DIR true
Sublime Layers - my blog on Musings and Experiments in 3D Printing Technology and Art
Start Here:
A Strategy for Successful (and Great) Prints
Strategies for Resolving Print Artifacts
The Eclectic Angler
Re: Mhackney's Rostock Max
With the .92.3 release they were on the motion tab. Invert motors were with each axis and end stops were down below that. Min end stops aren't really on there from what I know.
.93 is out?
.93 is out?
Re: Mhackney's Rostock Max
Opps, sorry, missed a digit - v 0.92.3
I'll check that, thanks.
Now I am having a problem with it recognizing my FSR control board on the Z min endstop. I'm running an X3 Pro like you, using FSRs connected to the little control board and connected to the Z min endstop connector on the board. The controller is working as I see it trigger when I press the bed with a finger. I just configured my son's kossel with RAMBO this weekend and it went smoothly. I must be missing something with the X3 Pro???
The switch input always shows low with a G31 command.
Sublime Layers - my blog on Musings and Experiments in 3D Printing Technology and Art
Start Here:
A Strategy for Successful (and Great) Prints
Strategies for Resolving Print Artifacts
The Eclectic Angler
Re: Mhackney's Rostock Max
I have mine connected to Z Max, my setup is a little backwards though.
Firmware setup is:
Electronics, its just connected to the Z Max endstop connector. +, sig, - (from left to right, though my board is "upside down" (USB port on left, bed outputs on right))
Firmware setup is:
Code: Select all
#define ENDSTOP_PULLUP_Z_MAX true
#define ENDSTOP_Z_MAX_INVERTING false
#define MAX_HARDWARE_ENDSTOP_Z trueRe: Mhackney's Rostock Max
Thanks. How did you get a backwards setup? Do you have endstops at the top but they are configured as min?
Sublime Layers - my blog on Musings and Experiments in 3D Printing Technology and Art
Start Here:
A Strategy for Successful (and Great) Prints
Strategies for Resolving Print Artifacts
The Eclectic Angler
Re: Mhackney's Rostock Max
Hey wait, my board is upside down too with USB on left but I have the wiring configured as sig/+/-
That is probably the problem, I need to check the X3 Pro board layout.
That is probably the problem, I need to check the X3 Pro board layout.
Sublime Layers - my blog on Musings and Experiments in 3D Printing Technology and Art
Start Here:
A Strategy for Successful (and Great) Prints
Strategies for Resolving Print Artifacts
The Eclectic Angler
Re: Mhackney's Rostock Max
So, RAMBo endstop terminals are labeled + | - | S (left to right with USB port facing left). This is very clear. The X3 Pro is labeled + | Z- | - (left to right with USB facing left). Not as clear. For some reason I assumed the Z- was the (-) pin like on the RAMBo. Anyhow, I'll change the pins in the connector tomorrow and give it a go.
Sublime Layers - my blog on Musings and Experiments in 3D Printing Technology and Art
Start Here:
A Strategy for Successful (and Great) Prints
Strategies for Resolving Print Artifacts
The Eclectic Angler
Re: Mhackney's Rostock Max
I had the X3 Pro on my Hackimaker before I got the the MAX. When I installed the X3 Pro in my MAX, I was forgetting that I needed enough wire to reach the max connections, since the Ultimaker uses the min endstops and not the max (or at least mine did). I connected the endstops to the min endstops again, like I was used to and I didn't think about it until I got to firmware.
Re: Mhackney's Rostock Max
The wiring was the problem, now it is probing like gangbusters. Now I am trying out the repetier firmware's "Z correction".
Sublime Layers - my blog on Musings and Experiments in 3D Printing Technology and Art
Start Here:
A Strategy for Successful (and Great) Prints
Strategies for Resolving Print Artifacts
The Eclectic Angler
Re: Mhackney's Rostock Max
Tell me how it goes, when I tried it out it seemed kinda jenky, but that was an early .92 version.
Re: Mhackney's Rostock Max
It seems to be doing it's thing but the implementation is not all that great:
1) it does not calculate delta arm length and radius, it simply gives a Z height map of a rectangular area of the bed. You can use this to tweak arm and radius but that's a PIA.
2) it only measures a rectangular area, not a circle. So on a delta you are limited to the largest incised square. That's a PIA.
3) I haven't created a Z height map and used that to print yet but the instructions (which are not very well written) say to limit it to the first layer or few for performance reasons. That will result in better first layer stick but distorted out of dimension parts.
Now that I have the FSRs installed and working to my satisfaction, I think my next move is to Smoothie. I just need to finish setting up one of the 2 I got during the sale.
Sublime Layers - my blog on Musings and Experiments in 3D Printing Technology and Art
Start Here:
A Strategy for Successful (and Great) Prints
Strategies for Resolving Print Artifacts
The Eclectic Angler
Re: Mhackney's Rostock Max
Is there a tutorial on adding FSR's to the Orion and Max? Mostly the process of configuring the firmware and code needed to automatically set Z zero.
Re: Mhackney's Rostock Max
No and that is primarily due to the poor support for probing deltas with Repetier. It currently does not do auto calibration and the basic leveling is not really going to save you much time. Smoothie is much better - especially with Pilot626's branch.
Sublime Layers - my blog on Musings and Experiments in 3D Printing Technology and Art
Start Here:
A Strategy for Successful (and Great) Prints
Strategies for Resolving Print Artifacts
The Eclectic Angler
Re: Mhackney's Rostock Max
Would you mind sharing the FSR mount stl files? I wouldn't mind trying them out...
Cheers..
Cheers..
I'm not an alcoholic...I'm Australian!