Page 3 of 5
Re: Rostock MAX v3...
Posted: Sat Sep 10, 2016 4:21 pm
by KAS
sfuelberth wrote:So I just got mine delivered, however I am not seeing any sort of documentation. Is that still a work in progress or is there a link to them someplace that I am not seeing? Thanks
http://seemecnc.dozuki.com/c/Rostock_Max_v3
Re: Rostock MAX v3...
Posted: Sat Sep 10, 2016 4:46 pm
by sfuelberth
Thanks
Re: Rostock MAX v3...
Posted: Sat Sep 10, 2016 8:04 pm
by abecker
Lets see some build logs/pics!
Re: Rostock MAX v3...
Posted: Sat Sep 10, 2016 9:25 pm
by Qdeathstar
Where is geneb's one
Re: Rostock MAX v3...
Posted: Sun Sep 11, 2016 10:45 am
by geneb
Re: Rostock MAX v3...
Posted: Mon Sep 12, 2016 2:02 am
by sfuelberth
I can post pics as it goes along, I had things come up this weekend though. I'll try and take some pics as we work through it.
Re: Rostock MAX v3...
Posted: Mon Sep 12, 2016 2:14 am
by sfuelberth
I'd like to say I know the manual is still a wip I love the animated parts. props to the documentation team, i'll probably have questions though.
Re: Rostock MAX v3...
Posted: Mon Sep 12, 2016 9:11 am
by Tincho85
Yeap, loving the manual.
One thing I didn't notice before. Some steps have links to gene building it.
Re: Rostock MAX v3...
Posted: Mon Sep 12, 2016 9:45 am
by Tincho85
One qustion, this is for tightening the belts? Pretty clever if so.
[img]
https://d17kynu4zpq5hy.cloudfront.net/i ... mSh.medium[/img]
Re: Rostock MAX v3...
Posted: Mon Sep 12, 2016 10:02 am
by geneb
Yes. The stepper motor is now the belt tension adjustment.

g.
Re: Rostock MAX v3...
Posted: Mon Sep 12, 2016 12:53 pm
by Eaglezsoar
Gene, are you working on your normal PDF instructions or is the one posted by JJ is all there is going to be.
I see no where I can download and print out the present docs, is there a way or we forced to be online while building.
Your assembly manuals were the best I have ever seen and they were also downloadable!
Please tell me if the technology has taken on a huge leap but the docs have taken a step backwards.
Re: Rostock MAX v3...
Posted: Mon Sep 12, 2016 1:06 pm
by geneb
The Dozuki instructions are all that will be there - the only PDF docs that will remain will be a generic user guide for MatterControl that will cover all the printers.
g.
Re: Rostock MAX v3...
Posted: Mon Sep 12, 2016 1:12 pm
by Mac The Knife
So an internet connection is required at the time of building.
Re: Rostock MAX v3...
Posted: Mon Sep 12, 2016 1:28 pm
by geneb
I'm pretty sure there's a "Download as PDF" link somewhere above the "Step 1" header...
g.
Re: Rostock MAX v3...
Posted: Mon Sep 12, 2016 3:07 pm
by Eaglezsoar
geneb wrote:I'm pretty sure there's a "Download as PDF" link somewhere above the "Step 1" header...
g.
If someone manages to find the "download as PDF" please tell the group where it is.
I for one do not feel you should have to have an internet connection to access the docs,
the old Docs were great, downloadable and printable. Like I have said before, 2 steps forward in technology
and two steps backwards on documentation. I am not complaining about the V3 docs; I am complaining
that they are not downloadable and thus not printable.
Re: Rostock MAX v3...
Posted: Mon Sep 12, 2016 3:33 pm
by geneb
Right below the "Files" section, there's a bit that says "Formats: PDF XML Embed" at the lower right. You can click on the "PDF" link to get the PDF version of the guide.
g.
Re: Rostock MAX v3...
Posted: Mon Sep 12, 2016 4:27 pm
by Tincho85
Hi Gene, you said that the black wire goes to the Rambo and the red one to the PSU unit.
Like this then? It might seem silly but I need to double check
[img]
https://c1.staticflickr.com/9/8540/2901 ... c9e7_o.jpg[/img]
and what about the 6 wires that goes from the PSU to the Rambo?
Should we still connect the first 2? If I remember correctly those are the ones that feed the bed.
Re: Rostock MAX v3...
Posted: Mon Sep 12, 2016 4:58 pm
by Eaglezsoar
geneb wrote:Right below the "Files" section, there's a bit that says "Formats: PDF XML Embed" at the lower right. You can click on the "PDF" link to get the PDF version of the guide.
g.
Thank you Gene, you are the man!
Re: Rostock MAX v3...
Posted: Mon Sep 12, 2016 8:50 pm
by cloneit3d
I got my machine today and the package looked a little beat up with lots of melamine bits floating around although I assume they are not needed. There could have been more done on the inside to protect the contents. Hope everything is ok. I took pictures as part of documenting the build from start to finish.
Re: Rostock MAX v3...
Posted: Mon Sep 12, 2016 9:55 pm
by geneb
Tincho85 wrote:Hi Gene, you said that the black wire goes to the Rambo and the red one to the PSU unit.
Like this then? It might seem silly but I need to double check
[img]
https://c1.staticflickr.com/9/8540/2901 ... c9e7_o.jpg[/img]
and what about the 6 wires that goes from the PSU to the Rambo?
Should we still connect the first 2? If I remember correctly those are the ones that feed the bed.
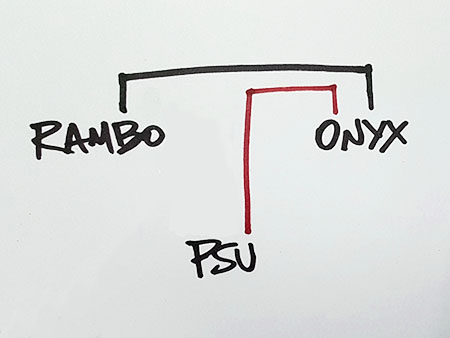
The wiring goes like this:
1 12ga Black Wire - X tower
1 12ga Black Wire - Y Tower
2 26ga White Wires - Y Tower (thermistor wires from Onyx)
1 12ga Red Wire - Z Tower
The 12ga black wire from the onyx goes into the power connector for the heated bed.
The other 12ga black & red wires go into the power connection for the rambo - there'll be detail on that later - I apologize for the delay!
There should be jumper wires included to jumper the other two positions on that connector, just like the v2 was wired with the dedicated power supply.
The power wiring to and from the rambo are not performed until you reach the final assembly task. If you're there and you need help with the wiring, please email support.
g.
Re: Rostock MAX v3...
Posted: Mon Sep 12, 2016 10:10 pm
by Tincho85
geneb wrote:
The wiring goes like this:
1 12ga Black Wire - X tower
1 12ga Black Wire - Y Tower
2 26ga White Wires - Y Tower (thermistor wires from Onyx)
1 12ga Red Wire - Z Tower
The 12ga black wire from the onyx goes into the power connector for the heated bed.
The other 12ga black & red wires go into the power connection for the rambo - there'll be detail on that later - I apologize for the delay!
There should be jumper wires included to jumper the other two positions on that connector, just like the v2 was wired with the dedicated power supply.
The power wiring to and from the rambo are not performed until you reach the final assembly task. If you're there and you need help with the wiring, please email support.
g.
Sorry, I'm not building a V3, still have the old model. But I'm experiencing a very annoying sound from the PSU when the bed is regulating the temperature.
So I wanted to try to connect it like this instead, maybe I get lucky and the sound disappears.
Re: Rostock MAX v3...
Posted: Tue Sep 13, 2016 11:21 am
by geneb
Apparently I take really bad notes.
Here's the correct wiring:
X tower = 1x 12ga black + 2x 26ga white. Used for heated bed to rambo
Y tower = 1x 12ga red. Used for psu to rambo power input
Z tower = 1x 12ga black. Used for psu to rambo power input
*facedesk*
g.
Re: Rostock MAX v3...
Posted: Wed Sep 14, 2016 3:44 pm
by Eaglezsoar
Thanks Gene, you are 100% correct and John from SeeMeCNC verified how to download the docs as a PDF and it all works fine!!!
Re: Rostock MAX v3...
Posted: Thu Sep 15, 2016 11:15 pm
by Maddog
What temperature does that thermal fuse "pop"? The web site and manual says nothing I could find.
That new hot end is a major good move. I hate RTV and it takes forever to assemble. The new hot end looks like a drone with 3 motors.
Anybody independent reviewed the autoleveling feature yet? Does it work good? How accurate is it?
While putting all the goodies up top may work for SEEMECNC, being top heavier is not a good thing. It's taller right? It was tall enough already.
I personally would have added a cable routing channel down along the back side of the Z tower like other vendors and left the controller down south.
The cabling would be simple, modifiable and easier to trouble shoot. Try to add an extruder as is.
I prefer all the motors down by the power supply and not having the controller/display up high.
Good news going to 24 volts and dropping the PC power supply. That was a kludge from day one.
Making all the stepper mounts the same and with injected parts was a nice touch.
I would like to see stepper vibration mounts that reduce noise. Cork gaskets work?
They fixed it so you can tighten the belts without 3 hands? Phillips Screwdriver, wrench and flat screwdriver. I prefer to use 2 hands.
I was hoping they would add a dual extruder option and a real place for the filament spool to go.
Re: Rostock MAX v3...
Posted: Fri Sep 16, 2016 12:31 am
by travelphotog
On Monday a nice big white box with a cool logo on it is set to arrive at the 713maker shop. Steve and the crew at SeemeCNC have been very kind and sent 713maker.com out a printer from one of the few first batches of V3 kits so we can start working on some ideas for the V3 we have. We also ordered in another accel board for testing on the V2 we already have in the shop and to help us rapidly design and test an adapter to fit the accel board to our current mounts and effector system. We will also look at an adaptor to work with under mounted hot ends and the accel board as we know a fair number of folks like under mounted hot ends. We also ordered in some of the new cooling fans and will be working to see if they might be adopted to our effector plates while still keeping the maximum amount of inner space so everyone can run their hot end of choice on the V2 and V3 printers. We are setting up the studio this weekend so we can document the build and post a nice build log on the V3 so everyone can get a good feel for the build compared to the V2. We are extremely grateful to Steve and the gang at SeemeCNC for sending us the V3 for product development and know we have a big challenge ahead of us on the V3 since it really seems like the guys did an amazing job of adding some great new features. When our printer arrives Monday we will start our build post and try to document the steps as best we can along the way.