Rostock Max V2 build with a few upgrades from the start.
-
travelphotog
- Printmaster!
- Posts: 398
- Joined: Tue Jul 15, 2014 12:30 pm
- Location: Huntsville, Alabama (Marshall Space Flight Center)
- Contact:
Re: Rostock Max V2 build with a few upgrades from the start.
I am working on my heated and humidity controlled printer enclosure now. It will need a few boards made for the Arduino environmental control system. I will post the process with pics when I do. By the time I have the enclosure designed in CAD and the beta prints made and fitted, I should have my mill and can give you guys a good idea of how it mills the PCBs then.
http://713maker.com/ Custom aluminum and carbon fiber hot end mounts for the Rostock Max and Orion.
Re: Rostock Max V2 build with a few upgrades from the start.
There's also a program called pcb-gcode that runs as a script within Eagle. It's open source and works pretty well.
g.
g.
Delta Power!
Defeat the Cartesian Agenda!
http://www.f15sim.com - 80-0007, The only one of its kind.
http://geneb.simpits.org - Technical and Simulator Projects
Defeat the Cartesian Agenda!
http://www.f15sim.com - 80-0007, The only one of its kind.
http://geneb.simpits.org - Technical and Simulator Projects
-
travelphotog
- Printmaster!
- Posts: 398
- Joined: Tue Jul 15, 2014 12:30 pm
- Location: Huntsville, Alabama (Marshall Space Flight Center)
- Contact:
Re: Rostock Max V2 build with a few upgrades from the start.
Well it was a really long night of CAD work.. But I knocked out a few things and among them was the lower part of my full build area enclosure. I just have to print the beta prototypes later today and get the final fittings worked out. Will have Arduino controlled full temp and humidity controls.
Sorry for the mess in the shot. I am still setting up the printer how I want to and printing off parts. This shot has the side ventilation panel that just finished as I was fitting the enclosure pattern to double check everything.
- A pattern fit of the new full build area enclosure. temp and humidity controls soon to come.
http://713maker.com/ Custom aluminum and carbon fiber hot end mounts for the Rostock Max and Orion.
-
Eaglezsoar

- ULTIMATE 3D JEDI
- Posts: 7159
- Joined: Sun Apr 01, 2012 5:26 pm
Re: Rostock Max V2 build with a few upgrades from the start.
Oh No! I have scripts running inside me! I am doomed!geneb wrote:There's also a program called pcb-gcode that runs as a script within Eagle. It's open source and works pretty well.
g.
-
travelphotog
- Printmaster!
- Posts: 398
- Joined: Tue Jul 15, 2014 12:30 pm
- Location: Huntsville, Alabama (Marshall Space Flight Center)
- Contact:
Re: Rostock Max V2 build with a few upgrades from the start.
OK a few updates...
I threw together a nice new home for my new best friend in CAD the other night.
I am now working on the upper fixture for the enclosure and the locking system to keep it all together without adding holes to the MAX. I should have more done shortly. Though I do have a few photo shoots to knock out in the next couple of days and also need to get hopping on my filament extruder this weekend. At the rate I am going through filament I am REALLY looking forward to getting that puppy up and running.
I threw together a nice new home for my new best friend in CAD the other night.
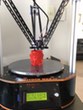
- Box and insert for calibration dial.
- All nice and happy in a safe new home. That old cardboard box HAD to go.
- Beta panels for full build area enclosure fit check are all printed and everything fits perfectly!
http://713maker.com/ Custom aluminum and carbon fiber hot end mounts for the Rostock Max and Orion.
-
travelphotog
- Printmaster!
- Posts: 398
- Joined: Tue Jul 15, 2014 12:30 pm
- Location: Huntsville, Alabama (Marshall Space Flight Center)
- Contact:
Re: Rostock Max V2 build with a few upgrades from the start.
- Progress has been made on the enclosure. Render is not complete but the deisgn is almost finished. Will be printing the lower platform pieces this weekend.
http://713maker.com/ Custom aluminum and carbon fiber hot end mounts for the Rostock Max and Orion.
-
nitewatchman

- Printmaster!
- Posts: 624
- Joined: Thu May 01, 2014 9:51 pm
- Location: Birmingham, Alabama
Re: Rostock Max V2 build with a few upgrades from the start.
Looks promising.
-
travelphotog
- Printmaster!
- Posts: 398
- Joined: Tue Jul 15, 2014 12:30 pm
- Location: Huntsville, Alabama (Marshall Space Flight Center)
- Contact:
Re: Rostock Max V2 build with a few upgrades from the start.
Thanks! Will be working on the joints between the pieces today and mating them to the Rostock.. REALLY trying to avoid having to make any new holes in my printer... Time will tell how THAT works out. I am hoping to just use some of the screws already in place by just adding longer ones and mating the support pieces to the printer that way. I should have a few BETA pieces done by tonight.
http://713maker.com/ Custom aluminum and carbon fiber hot end mounts for the Rostock Max and Orion.
Re: Rostock Max V2 build with a few upgrades from the start.
Updates?
Also, are you doing this as a community project, or do you intend on going commercial with it?
Mind sharing what you have done so far with the peltiers, i will need to start to source parts.
Also, are you doing this as a community project, or do you intend on going commercial with it?
Mind sharing what you have done so far with the peltiers, i will need to start to source parts.
When on mobile I am brief and may be perceived as an arsl.
-
travelphotog
- Printmaster!
- Posts: 398
- Joined: Tue Jul 15, 2014 12:30 pm
- Location: Huntsville, Alabama (Marshall Space Flight Center)
- Contact:
Re: Rostock Max V2 build with a few upgrades from the start.
I am still working on the joints between the pieces on the enclosure. I am trying to avoid drilling any new holes in the printer and yet still support pieces needed to enclose the build area. I did a few test joints and think I found one I like. I have the uprights finished and done how I wanted them. They now have counter sunk screw holes to mount the Plexiglas and also have a track to hold LED light strips so the inside will be nice and bright. I also have made sure there is a nice channel up the middle inside of them to allow for more wires to be run to the top for things like lights and a second EZStruder system. I still have to finalize the door design for both chambers (build area and filament area) Right now I am leaning towards a door that is removed instead of hinged due to weight issues for the size doors I want. I think if hinged they will both be too large (in the way) and put too much stress on the enclosure. Instead I am thinking of having the whole panel be held in place with N50 Neodymium magnets. This will keep it in place yet also allow it to be removed and easy access for large prints (the kind I will be making for my projects). Once I have the enclosure finished I will start work on the environmental control system.teoman wrote:Updates?
Also, are you doing this as a community project, or do you intend on going commercial with it?
Mind sharing what you have done so far with the peltiers, i will need to start to source parts.
I just ordered my CNC mill last night so there will be a small delay when it arrives and I get it built and set up. Once that is done though I should be able to fast track the control system. But I am still looking at a few weeks before I have that aspect up and running in a BETA mode. I am going to use the peltier to heat/cool a closed loop water heat exchange system. The system will first remove the water in the build area then heat the chamber to the desired temp. At least that is the thought process. I need more test to see how it holds up in practice.
I am thinking of offering the enclosure as a kit for the Max V2. The filament chamber and the dehumidifier are being designed so they can be added at any time to the base system. Not everyone will need all aspects of my design. It will also allow someone to add them later as time and funds allow. I often have to buy bits and pieces of projects as funds allow so i am trying to design that concept in from the start so it can be used by far more people.
Well... I have a 21 hour print on the platter right now with over 8 hours left to go... So I guess I have no reason not to get back on the CAD design and decide on a joint system and move everything forward.
http://713maker.com/ Custom aluminum and carbon fiber hot end mounts for the Rostock Max and Orion.
-
Jimustanguitar

- ULTIMATE 3D JEDI
- Posts: 2608
- Joined: Sun Mar 31, 2013 1:35 am
- Location: Notre Dame area
- Contact:
Re: Rostock Max V2 build with a few upgrades from the start.
[img]http://i.imgur.com/2AmKIgd.png[/img]travelphotog wrote:Looking forward to seeing the pic of the RAMBO wires.
[img]http://i.imgur.com/EnKKTRy.png[/img]
Re: Rostock Max V2 build with a few upgrades from the start.
I picked these little guys up off Ebay after doing a bit of research on here and I few other spots. They were easy to mount and....
How many of the dampeners did you use, I see the three on the tower motors. Did you use one on the fourth motor as well?
Thanks
How many of the dampeners did you use, I see the three on the tower motors. Did you use one on the fourth motor as well?
Thanks
Bob
Rostock Max V2, Ball Cup Arms, New Carriages, HE280, Dampers, PSU Breathing, Simplify 3D, GeckoTek3D, Raspberry Pi3. Duet soon... Kossel Mini still under construction.
Delta's are the way!
Rostock Max V2, Ball Cup Arms, New Carriages, HE280, Dampers, PSU Breathing, Simplify 3D, GeckoTek3D, Raspberry Pi3. Duet soon... Kossel Mini still under construction.
Delta's are the way!
-
travelphotog
- Printmaster!
- Posts: 398
- Joined: Tue Jul 15, 2014 12:30 pm
- Location: Huntsville, Alabama (Marshall Space Flight Center)
- Contact:
Re: Rostock Max V2 build with a few upgrades from the start.
I just used the three on the towers and we LOVE them! Not sure if it would do much good on the Fourth motor really due to how it is mounted.
http://713maker.com/ Custom aluminum and carbon fiber hot end mounts for the Rostock Max and Orion.
Re: Rostock Max V2 build with a few upgrades from the start.
Any updates on your dehumidifier?
When on mobile I am brief and may be perceived as an arsl.
-
Eaglezsoar
- ULTIMATE 3D JEDI
- Posts: 7159
- Joined: Sun Apr 01, 2012 5:26 pm
Re: Rostock Max V2 build with a few upgrades from the start.
Most users use the dampers on the 3 axis and have noticed a tremendous reduction in sound. Only a few users put a damper on the extruder and it did not make it a whole lottravelphotog wrote:I just used the three on the towers and we LOVE them! Not sure if it would do much good on the Fourth motor really due to how it is mounted.
quieter as the axis dampers did.
Re: Rostock Max V2 build with a few upgrades from the start.
Would an enclosure help with noise or amplify noise? Probably depends on design.
When on mobile I am brief and may be perceived as an arsl.
-
travelphotog
- Printmaster!
- Posts: 398
- Joined: Tue Jul 15, 2014 12:30 pm
- Location: Huntsville, Alabama (Marshall Space Flight Center)
- Contact:
Re: Rostock Max V2 build with a few upgrades from the start.
The style I am building will not help much with noise I am afraid. Currently I am doing a redesign of a few aspects of mine. After working with my printer none stop for a few weeks I can see a few flaws I need to fix. I should have a few changes knocked out shortly.
My CNC mill came in and I have been busy printing parts (drag chain and such) for it along with putting it together and getting it calibrated. Sorry I have been away for so long. I will try to drop back by this weekend if I can.
My CNC mill came in and I have been busy printing parts (drag chain and such) for it along with putting it together and getting it calibrated. Sorry I have been away for so long. I will try to drop back by this weekend if I can.
http://713maker.com/ Custom aluminum and carbon fiber hot end mounts for the Rostock Max and Orion.
Re: Rostock Max V2 build with a few upgrades from the start.
I'm currently building an enclosure based on rymnd's design. One thing I'm doing is putting rubber washers between the brackets and the plexiglass so vibrations don't make the plexi resonate.travelphotog wrote:The style I am building will not help much with noise I am afraid.
Re: Rostock Max V2 build with a few upgrades from the start.
I like the crimp connectors on the power cables, I am stealing the idea tooJimustanguitar wrote:[img]http://i.imgur.com/2AmKIgd.png[/img]travelphotog wrote:Looking forward to seeing the pic of the RAMBO wires.
Thanks....
Bob
Rostock Max V2, Ball Cup Arms, New Carriages, HE280, Dampers, PSU Breathing, Simplify 3D, GeckoTek3D, Raspberry Pi3. Duet soon... Kossel Mini still under construction.
Delta's are the way!
Rostock Max V2, Ball Cup Arms, New Carriages, HE280, Dampers, PSU Breathing, Simplify 3D, GeckoTek3D, Raspberry Pi3. Duet soon... Kossel Mini still under construction.
Delta's are the way!
-
travelphotog
- Printmaster!
- Posts: 398
- Joined: Tue Jul 15, 2014 12:30 pm
- Location: Huntsville, Alabama (Marshall Space Flight Center)
- Contact:
Re: Rostock Max V2 build with a few upgrades from the start.
- This is what has been keeping my away so much. New CNC mill arrived at last!
Sorry i have been away so much of late. A few days ago the CNC mill arrived and I have been working like mad to build a new work station for it, shoot a ton of photo shoots for work and get the CNC mill put together. The Rostock has been printing doing the very thing I bought it for, printing things for the CNC. I've been keep the Rostock busy with all sorts of items for the CNC mill set up. I've printed a TON of drag chain and Misc parts for limit switches and such. I have the CNC finished up by this weekend for the Geek Gathering here in Houston. I will be away a bit more while I finish this up.
On a good note though... All this printing has really made me understand even more about using my printer and how I need to change a few things on the enclosure. I even solved a nagging issue I had the other day while at the store picking up CNC supplies. I've found the way to join the sections of the enclosure which I like and can be easily done by others. I just got in a few new rolls of black PLA today so I can get back to printing the BETA pieces and run the last few tests before I print the whole thing.
Catch everyone in a few days.
http://713maker.com/ Custom aluminum and carbon fiber hot end mounts for the Rostock Max and Orion.
Re: Rostock Max V2 build with a few upgrades from the start.
Shapeoko?
g.
g.
Delta Power!
Defeat the Cartesian Agenda!
http://www.f15sim.com - 80-0007, The only one of its kind.
http://geneb.simpits.org - Technical and Simulator Projects
Defeat the Cartesian Agenda!
http://www.f15sim.com - 80-0007, The only one of its kind.
http://geneb.simpits.org - Technical and Simulator Projects
-
travelphotog
- Printmaster!
- Posts: 398
- Joined: Tue Jul 15, 2014 12:30 pm
- Location: Huntsville, Alabama (Marshall Space Flight Center)
- Contact:
Re: Rostock Max V2 build with a few upgrades from the start.
geneb wrote:Shapeoko?
g.
- The Shapeoko 2 with a fair amount of 3D printed parts.
We hit up a "Geek Gathering" last night and it went great. I've got a few orders for both 3d prints (not many have the print size of the MAX) and half a dozen PCBs to mill out in the next week. On top of all that I am trying to get my filament extruder parts sourced and get that guy up and running. Once all of THAT is done I can look into milling out the parts for a plastic shredder and finish up the enclosure on the MAX so I can start playing with large ABS and PC prints.
http://713maker.com/ Custom aluminum and carbon fiber hot end mounts for the Rostock Max and Orion.
Re: Rostock Max V2 build with a few upgrades from the start.
Sounds like you have been having a ball 
My Rostock is at a standstill waiting for some more mod parts and a crimping tool, I'm not in a real hurry.
My Rostock is at a standstill waiting for some more mod parts and a crimping tool, I'm not in a real hurry.
Bob
Rostock Max V2, Ball Cup Arms, New Carriages, HE280, Dampers, PSU Breathing, Simplify 3D, GeckoTek3D, Raspberry Pi3. Duet soon... Kossel Mini still under construction.
Delta's are the way!
Rostock Max V2, Ball Cup Arms, New Carriages, HE280, Dampers, PSU Breathing, Simplify 3D, GeckoTek3D, Raspberry Pi3. Duet soon... Kossel Mini still under construction.
Delta's are the way!
-
Eaglezsoar
- ULTIMATE 3D JEDI
- Posts: 7159
- Joined: Sun Apr 01, 2012 5:26 pm
Re: Rostock Max V2 build with a few upgrades from the start.
A very nice CNC router. Too use 3D printed parts as part of it is ingenious, great job!
-
travelphotog
- Printmaster!
- Posts: 398
- Joined: Tue Jul 15, 2014 12:30 pm
- Location: Huntsville, Alabama (Marshall Space Flight Center)
- Contact:
Re: Rostock Max V2 build with a few upgrades from the start.
Thanks! The funny part is that I stumbled across the Max V2 while doing research on my CNC mill. I soon saw I would need a fair amount of 3D printed parts to get the mill set up for what I need, at least until I could mill the parts in aluminum once I had the mill. Just the cable chain alone was a life saver with the 3D printer. Most of the electronics are housed in one form or another in something off the printer. I will be building a new case for the brains of the mill at some point but for now it is all 3D printed.
Now I need to get back to the 3D plastics world and get my extruder built and stop paying so much for prototyping things. Looking to start out in PLA first. Ran into a number of of folks at the local Geek Gathering who are doing smaller maker spaces and hoping we can provide them with some low cost high quality PLA filament by the first of the year. Our main goal is to look into recycling PET bottles into a usable filament. Gatorade bottles are the first target. Hoping to limit the source so I am not chasing gremlins from different sources of bottles and bottle making plastics processes or release agents. Now that I have my mill I can knock out a few of the mounting plates and the heater block for the extruder shortly and get the whole process rolling..
I have found some major changes I want to make to my enclosure design. I have seen a few things about my current design that will not work well in the long run. Has anyone come up with a realistic alternative to the clamps on the build plate glass? I have not seen anything that holds real promise but I will admit that they are a bit of a kink in how I would LIKE to use my design. For now I am just having to slim down the inner edge of the enclosure body to allow for servicing of the build plate glass and the clamps. I am very much all ear for anything that would be easier to remove from a door instead of the sides like stock.
I should have a few redesigns knocked out and get back on that project shortly.
I can not say enough about how great my Max is printing and how it has fundamentally changing my how designed process for the better. No longer are projects locked to "stock" enclosures or put off do to high out-sourced fabrication costs. I think the only downside to the whole thing is how busy I am now with all these projects. between design, printing, milling and the odd photo shoot I hardly find time to come hang out here any more. But I hope to make the time, even if it is as a night owl!
Cheers all! CAD awaits!
- I have the mill dialed in pretty well so far for what I intended it for.
I have found some major changes I want to make to my enclosure design. I have seen a few things about my current design that will not work well in the long run. Has anyone come up with a realistic alternative to the clamps on the build plate glass? I have not seen anything that holds real promise but I will admit that they are a bit of a kink in how I would LIKE to use my design. For now I am just having to slim down the inner edge of the enclosure body to allow for servicing of the build plate glass and the clamps. I am very much all ear for anything that would be easier to remove from a door instead of the sides like stock.
I should have a few redesigns knocked out and get back on that project shortly.
I can not say enough about how great my Max is printing and how it has fundamentally changing my how designed process for the better. No longer are projects locked to "stock" enclosures or put off do to high out-sourced fabrication costs. I think the only downside to the whole thing is how busy I am now with all these projects. between design, printing, milling and the odd photo shoot I hardly find time to come hang out here any more. But I hope to make the time, even if it is as a night owl!
Cheers all! CAD awaits!
http://713maker.com/ Custom aluminum and carbon fiber hot end mounts for the Rostock Max and Orion.